Hunter Ceiling Fans

  • Home
  • Hunter Manuals
  • Hunter Fan Parts
    • Hunter Ceiling Fan Remotes
    • Hunter Ceiling Fan Light Kits
    • Hunter Ceiling Fan Blade Arms
    • Hunter Ceiling Fan Blades
    • Hunter Ceiling Fan Downrods
    • Hunter Ceiling Fan Pull Chains
    • Hunter Ceiling Fan Wall Controls
    • Hunter Ceiling Fans Replacement Globes
  • Hunter Support
  • Hunter Commercial Ceiling Fans

Hunter Fan Remote Reset Guide

July 10, 2025 by admin Leave a Comment

Experiencing issues with your Hunter ceiling fan remote can quickly disrupt your home comfort, leaving you unable to adjust fan speeds or lighting. This guide will walk you through the essential Hunter fan remote reset process, a common and often simple troubleshooting step that can restore seamless control, clearing glitches and re-establishing communication between your remote and fan. Understanding when and how to perform this reset can save you time and frustration, getting your smart fan back to perfect operation.

When to Reset Your Hunter Fan Remote

A remote control reset is your first line of defense against many common fan control issues. You should consider resetting your Hunter fan remote whenever you experience unexplained unresponsiveness, erratic behavior, or a complete loss of function. This simple procedure clears temporary glitches in the remote’s internal memory and attempts to re-establish a fresh communication link with your ceiling fan’s receiver, much like restarting a computer resolves minor software issues.

Here are the key scenarios that indicate it’s time for a remote reset:

  • Unresponsive Buttons: You press buttons, but nothing happens on the fan or light.
  • Erratic Fan Behavior: The fan turns on or off unexpectedly, changes speed without command, or the light flickers.
  • After Battery Replacement: Even with new batteries, sometimes a remote needs a reset to properly connect.
  • Interference Issues: Other devices in your home might be causing signal interference. A reset can sometimes help the remote find a clearer signal path.
  • After a Power Outage: Power fluctuations can sometimes desynchronize the remote from the fan’s receiver.
  • Initial Setup Problems: If your remote isn’t pairing correctly during the initial fan installation, a reset is a good preliminary step before full reprogramming.

Expert Tip: Before attempting a full reset, ensure the simplest solution isn’t overlooked: check and replace the remote’s batteries. Weak batteries are a leading cause of unresponsive remotes and can mimic more complex issues.

Step-by-Step Guide: How to Perform a Hunter Fan Remote Reset

Performing a basic reset on your Hunter fan remote is typically a straightforward process that involves cycling the power to the fan itself. This often clears any temporary communication errors and prepares the remote for a fresh connection. Always ensure safety first by turning off power at the breaker before manipulating any electrical components.

Follow these steps carefully:

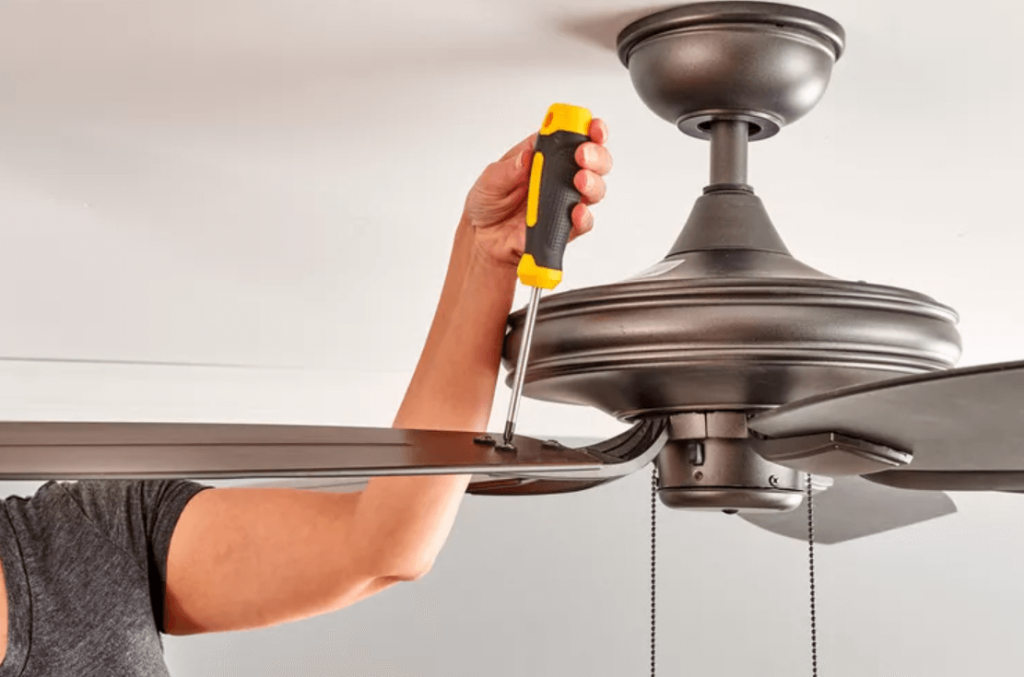
  1. Turn Off Power at the Circuit Breaker: Go to your home’s electrical panel and locate the circuit breaker that controls the power to your ceiling fan. Flip the breaker to the “OFF” position. This is crucial for safety and to properly cut power to the fan’s receiver unit.
  2. Wait for [Time]: Allow the power to remain off for at least 30 seconds to a full minute. This ensures that the fan’s internal receiver completely loses power and any residual charge is dissipated, effectively “resetting” its state.
  3. Turn Power Back On: Return to your circuit breaker and flip the breaker back to the “ON” position.
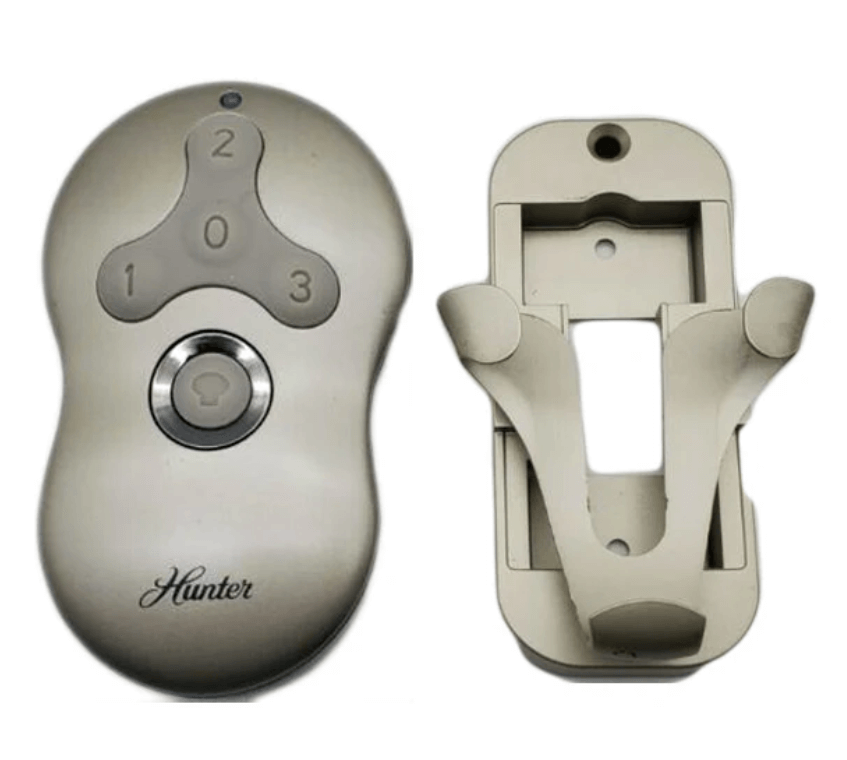
  4. Perform Remote Reset (If Applicable): Some Hunter remotes have a small “reset” button, often recessed to prevent accidental presses. If your remote has one (check your remote’s manual), press and hold it with a paperclip or pen tip for 5-10 seconds immediately after restoring power to the fan.
  5. Test the Remote: Within 60 seconds of restoring power (or performing the remote’s specific reset), try operating the fan. Press the fan “ON” button or try adjusting the speed. The fan or light should respond.

Important Note: This basic power-cycling method is often sufficient for a simple reset. However, a reset alone may not be enough if the remote has completely lost its pairing with the fan’s receiver. In such cases, the next crucial step is reprogramming.

After the Reset: What’s Next?

If your Hunter fan remote responds correctly after the reset, congratulations – you’ve resolved the issue! However, in many instances, especially after a complete loss of function or during initial setup, a simple reset acts as a precursor to a more comprehensive reprogramming process. Think of the reset as clearing the slate, and reprogramming as writing new instructions.

If your remote still isn’t working or responding consistently after the reset, it likely needs to be reprogrammed to the fan’s receiver. This involves specific steps to establish a new, stable communication link. Our article provides a detailed guide on how to reprogram hunter fan remote (this link will guide you through the full pairing process).

Troubleshooting Common Reset Issues

Sometimes, a straightforward reset might not yield the desired results. If your Hunter fan remote remains unresponsive or problematic after following the reset steps, consider these common troubleshooting tips:

  • Check Batteries Again: Even if you just replaced them, ensure they are inserted with correct polarity and are fresh. Try a different set of new batteries to rule out a faulty pack.
  • Verify Power to the Fan: Ensure the fan itself is receiving power. If the fan isn’t turning on via the pull chain (if it has one) or wall switch, the issue might be with the fan’s power supply, not just the remote.
  • Remote Dip Switches: Older Hunter fan remotes and receivers use “dip switches” (small physical switches inside the remote battery compartment and the fan’s receiver unit) to set a unique code. If these switches are not set identically on both the remote and the receiver, the remote will not work. You may need to access the fan’s canopy to check the receiver’s dip switches.
  • Clear Obstructions: Ensure there are no physical obstructions between the remote and the fan’s receiver. Large furniture or walls can sometimes block the signal.
  • Interference from Other Devices: Other remote-controlled devices, smart home hubs, or even neighbor’s fans operating on similar frequencies can cause interference. Try temporarily powering off other nearby wireless devices to see if the issue resolves.
  • Consult Your Manual: Every Hunter fan model can have slightly different remote reset and programming procedures. Always refer to your specific fan model’s user manual for precise instructions. You can usually find these on the official Hunter Fan website by searching for your model number.

For broader troubleshooting steps covering various remote issues, including physical damage or receiver problems, you can also consult our detailed guide: Hunter Ceiling Fan Remote Not Working.

When to Call a Professional

While many remote issues can be resolved with a simple reset or reprogramming, there are times when it’s best to call a qualified electrician or a Hunter authorized service technician. Prioritize your safety and avoid attempting complex electrical repairs yourself.

You should consider professional help if:

  • No Power to the Fan: The fan has no power, even after checking the circuit breaker and wall switch. This could indicate faulty wiring or a problem with the fan’s internal components.
  • Persistent Unresponsiveness: You’ve tried all reset and reprogramming steps, including checking batteries and dip switches, but the fan still doesn’t respond to the remote or wall controls.
  • Physical Damage: The remote or the fan’s receiver unit shows signs of physical damage (e.g., water damage, burnt smell).
  • Intermittent Power Issues: The fan works sometimes but frequently cuts out, suggesting a deeper electrical problem.
  • Safety Concerns: You are uncomfortable working with electrical wiring or troubleshooting electrical components.

For official support and further troubleshooting, you can always reach out to Hunter Ceiling Fans Customer Service.

Conclusion: Regain Control with a Simple Reset

A non-responsive Hunter fan remote can be a minor annoyance, but often, the solution is as straightforward as a simple reset. By understanding the common scenarios that call for a reset and following the step-by-step guide, you can frequently resolve minor communication glitches and restore full control over your ceiling fan’s comfort settings. While a reset often primes the system for optimal function, remember that reprogramming might be the next essential step to re-establish a solid connection. Empower yourself with these troubleshooting techniques to keep your Hunter fan running smoothly and enhance your home’s comfort year-round.

Filed Under: Hunter Ceiling Fan Troubleshooting

Instructions for Programming Hunter Fan Remote

June 20, 2025 by admin Leave a Comment

Programming your Hunter fan remote ensures seamless control over your comfort. The core process involves identifying your remote type (Learn Button or Dip Switch), preparing by checking batteries and cycling power, and then performing a specific button sequence or switch matching. Beyond basic pairing, many Hunter remotes offer advanced programming for features like light dimming, fan timers, and breeze modes. Always consult your specific fan and remote manual for precise instructions, as models vary. If you encounter issues, troubleshooting often involves repeating steps, checking power, and verifying settings.

A Hunter ceiling fan with a remote offers unmatched convenience, allowing you to fine-tune your environment with the press of a button. But before you can enjoy that perfect breeze or ideal lighting, your remote needs to speak the same language as your fan. This guide dives deep into the precise steps for programming your Hunter fan remote, ensuring you gain full control without the frustration. We’ll cover various remote types, essential pre-programming checks, and how to unlock advanced features beyond simple on/off.

Understanding Your Hunter Remote: The First Step to Programming

Before diving into button sequences or switch settings, it’s crucial to identify the “species” of Hunter remote you possess. Hunter has evolved its remote control technology over the years, leading to different programming methods.

  1. “Learn Button” Remotes (Modern & Universal Kits): These are commonly found in newer Hunter fans or universal remote kits. They feature a small, often recessed “Learn” or “Pair” button, usually located inside the battery compartment. This method relies on a timed signal transmission from the remote to the fan’s receiver. Examples include models like 99122, 27157, 99372.
  2. “Dip Switch” Remotes (Older Models & Universal Kits): Characterized by a row of tiny physical switches (typically 4 or 5) inside the battery compartment. These “dip switches” (Dual In-line Package switches) are used to set a unique frequency code that must match a corresponding set of dip switches on the fan’s receiver unit, located within the ceiling canopy. This method ensures your remote only controls your fan and not your neighbor’s!
  3. Pre-Paired Remotes: In rare instances, particularly if you bought a fan and remote as a matched set, they might come pre-programmed from the factory. While convenient, even these may require re-pairing if the remote is replaced or if power is extensively cycled.

Identifying your remote type is paramount, as the programming instructions differ significantly. If you’re unsure, check your fan or remote’s original manual, or look for visible switches or a button once you open the battery compartment.

Preparing for Programming: Essential Pre-Checks

Before you begin the programming ritual, a few critical preparatory steps can save you time and frustration. Skipping these often leads to failed programming attempts.

  1. Fresh Batteries are Non-Negotiable: This cannot be stressed enough. Even seemingly new batteries can be underpowered. Always install a brand new set of the correct type (e.g., AAA, 9V, A23) into your remote. Ensure they are inserted with the correct polarity (+/-). A weak battery is the single most common reason for failed programming.
  2. Power Cycle Your Fan (The System Reset): Most Hunter remote programming sequences require a complete power cycle of the fan. This resets the fan’s receiver, putting it into a “listening” or pairing mode for a short window.
    • Locate your fan’s circuit breaker: Go to your home’s main electrical panel and locate the breaker that controls the ceiling fan you intend to program.
    • Turn power OFF: Flip the breaker to the fully OFF position.
    • Wait: Allow at least 10-20 seconds (some recommend up to a minute) for any residual power to dissipate from the fan’s receiver. This “rest period” is crucial.
    • Turn power ON: Flip the breaker firmly back to the ON position.
    • Be Ready: The fan’s receiver will typically enter a pairing window for a limited time (often 60 seconds to 3 minutes) after power is restored. Have your remote ready to perform the programming sequence immediately.
    • Caution: Always confirm you are turning off the correct breaker. If unsure, consult a qualified electrician.
  3. Set Fan Pull Chains (If Applicable): If your Hunter fan has pull chains for speed and light, set them to their “on” positions before programming. Typically, the fan speed chain should be set to its highest setting, and the light chain (if present) should be turned ON. This ensures the remote can take full control. It’s often recommended to then shorten or remove these chains after successful programming to prevent accidental interference.

Programming by Remote Type: Step-by-Step Instructions

The exact programming method depends on your Hunter remote’s design. Follow the instructions for your specific type.

Method 1: Programming Hunter Remotes with a “Learn Button”

This is the most common method for modern Hunter remotes and many universal kits.

  1. Prepare the Fan: Complete the “Preparing for Programming” steps above: ensure fresh batteries in the remote and perform the power cycle by turning the fan’s circuit breaker OFF for 10-20 seconds, then back ON.
  2. Access the Learn Button: Immediately after restoring power to the fan, open your remote’s battery compartment. Locate the small “Learn” or “Pair” button.
  3. Press the Learn Button: Within the specified time window (usually 60 seconds to 3 minutes) after turning the power back on, press and immediately release the “Learn” or “Pair” button. Do not hold it down.
    • Note: Some Hunter remotes (e.g., specific 99xxx series or newer models) might require you to press and hold a combination of buttons (like “FAN OFF” and “HIGH,” or “FAN” and “LIGHT”) for 3-5 seconds instead of a dedicated “Learn” button. Always check your specific remote’s manual if a “Learn” button isn’t obvious or the quick press doesn’t work.
  4. Confirm Pairing: The fan’s light should blink once (or multiple times), or the fan might twitch/beep to indicate successful pairing. This is the fan acknowledging the remote’s signal.
  5. Test Functions: Immediately test all remote functions: turn the fan on/off, adjust speeds, turn the light on/off, and dim the light. If all functions work, your remote is successfully programmed.

Method 2: Programming Hunter Remotes with “Dip Switches”

This method is typical for older Hunter models or certain universal remote kits where a “Learn” button is absent. It involves physically matching frequency codes.

  1. Prepare the Fan: Perform the “Preparing for Programming” steps: ensure fresh batteries in the remote, and note that a power cycle is typically not part of the dip switch matching sequence itself, but good to do as a general system reset if you’re troubleshooting.
  2. Access Remote Dip Switches: Open the remote’s battery compartment. You will see a small row of tiny switches (usually 4 or 5) that can be set to either an “up” or “down” position. Note the current pattern.
  3. Access Receiver Dip Switches: This step requires accessing the fan’s receiver unit, which is located inside the ceiling canopy (the dome-shaped cover where the fan attaches to the ceiling).
    • Safety First: Turn the power OFF at the circuit breaker before attempting to access the receiver.
    • Remove Canopy: Carefully unscrew and lower the fan canopy to expose the wiring and the receiver unit.
    • Locate Receiver Dip Switches: Find the matching set of tiny switches on the receiver unit.
  4. Match the Patterns: The pattern of the dip switches on the remote must exactly match the pattern on the receiver. Use a small screwdriver, pen tip, or tweezers to carefully set the switches on both the remote and the receiver to an identical sequence (e.g., up-down-up-up).
    • Pro Tip for Multiple Fans: If you have more than one remote-controlled fan in your home, ensure each fan/remote pair has a unique dip switch pattern to prevent one remote from controlling multiple fans simultaneously. Avoid common patterns like all “up” or all “down.”
  5. Reassemble and Restore Power: Carefully tuck the receiver and wiring back into the canopy, re-secure the canopy, and then turn the power back ON at the circuit breaker.
  6. Test Functions: Test all functions of your remote. If the patterns match correctly, your remote should now control your Hunter fan.

Unlocking Advanced Features: Programming Beyond Basic Control

Many Hunter remotes offer more than just on/off and speed control. You can often program additional features to enhance your comfort and energy efficiency. The availability of these features depends on your specific Hunter fan and remote model. Always refer to your product’s manual for the precise instructions, as methods vary significantly.

  • Light Dimming Activation:
    • Some Hunter remotes require a specific sequence to enable the dimming feature, especially when switching between incandescent and LED bulbs, or if it was accidentally disabled.
    • Common methods involve:
      • Cycling the light on/off quickly.
      • Holding the light button while simultaneously pressing another button (e.g., “Fan Off” or “Learn”).
      • Pressing and holding both “Up” and “Down” light/fan arrows for several seconds.
    • Once enabled, dimming typically involves pressing and holding the light button (or dedicated dimming buttons) to cycle through brightness levels.
    • Expert Tip: Ensure you’re using dimmable LED bulbs if you intend to use the dimming function. Non-dimmable LEDs can flicker or be damaged if a dimming signal is sent.
  • Fan Timers: Some remotes allow you to set a timer for the fan to automatically turn off after a set duration (e.g., 1, 2, 4, 8 hours). This is great for saving energy or using the fan while falling asleep.
    • Programming usually involves pressing a dedicated “Timer” button repeatedly to cycle through the available time settings.
    • The fan might flash its light or beep to confirm the timer setting.
  • Breeze Mode/Natural Wind Simulation: Advanced Hunter remotes might include a “breeze” or “natural wind” mode that varies fan speed to mimic natural outdoor breezes.
    • This is often activated by a dedicated button press. Some models might allow programming the intensity or pattern of this mode via sequential presses or menu options.
  • Power-On Light (POL) Setting: This feature determines whether the fan’s light automatically turns on when power is restored (e.g., after a power outage or if controlled by a wall switch).
    • Programming POL usually involves a sequence of button presses while holding the “Learn” button or a combination of light/fan buttons. Check your manual for exact steps to toggle this feature on or off.

Troubleshooting Hunter Remote Programming Failures

Even with careful attention, programming can sometimes be tricky. If your Hunter remote isn’t responding after following the steps:

  • Repeat Precisely: The most common reason for failure is incorrect timing or button sequence. Go back through the steps for your specific remote type, paying meticulous attention to the “within X seconds” windows and whether to press and release or press and hold.
  • Re-Check Batteries: Seriously, try another new set of batteries. It’s a surprisingly frequent solution.
  • Power Cycle Again: A longer power cycle (e.g., 1 full minute off) can sometimes clear any lingering signals in the receiver.
  • Verify Dip Switches (if applicable): If your remote uses dip switches, double-check that the pattern on the remote exactly matches the pattern on the receiver in the fan’s canopy. A single switch out of place will prevent communication.
  • Is Your Remote “Learning”? For “Learn Button” remotes, ensure the fan is actually entering pairing mode (e.g., the light blinks) after the power cycle. If not, your power cycling might be too fast or too slow.
  • Fan Pull Chains: Confirm the fan’s pull chains are still set to high speed and the light is on, as they can override remote commands if not positioned correctly.
  • Receiver Issues: If multiple attempts fail, the issue might lie with the fan’s receiver unit or the remote itself. For broader troubleshooting beyond programming, refer to our comprehensive guide on Hunter Ceiling Fan Remote Not Working.

Next Steps: Installation and Further Details

This guide has focused on the crucial programming steps. If you are installing a new Hunter fan remote kit, or replacing a receiver, you will first need to handle the physical installation. For detailed instructions on this, please consult our guide on how to install a hunter ceiling fan remote. Once the physical installation is complete, return to this guide for the programming sequence.

For more in-depth knowledge on optimizing your fan’s functionality, our article how to program a hunter ceiling fan remote covers the steps of customizing your fan’s behavior, including advanced feature programming.

Conclusion: Mastering Your Hunter Fan Remote

Programming your Hunter fan remote is a gateway to effortless comfort and control in your home. By understanding the different remote types, diligently performing the pre-programming checks, and precisely following the pairing or dip switch matching instructions, you can quickly establish reliable communication between your remote and fan. Don’t shy away from exploring the advanced programming features that many Hunter remotes offer, as they provide an even greater level of personalization for your living space. With these instructions, you’re well-equipped to master your Hunter ceiling fan remote and enjoy the perfect breeze, every time.

Filed Under: Hunter Ceiling Fan Troubleshooting

How to Remove Hunter Ceiling Fan Blades with No Screws: A Step-by-Step Guide

June 4, 2025 by admin Leave a Comment

Learning how to remove Hunter ceiling fan blades with no screws can seem confusion in the beginning, especially when you’re used to traditional fasteners. While many older fans use visible screws to attach the blades, newer Hunter models often feature innovative, screw-free designs for easier installation and removal. These “quick-install” or “snap-on” systems can initially seem puzzling, but understanding how they work makes the process straightforward. This guide will walk you through identifying your Hunter fan’s blade attachment method and safely removing its blades, even without obvious screws.

tighten the fan blades

Safety First: Preparing for Blade Removal

Before attempting any work on your ceiling fan, prioritizing safety is non-negotiable. Skipping these crucial steps can lead to serious injury or damage to your fan.

  • Turn Off Power at the Breaker: This is the most critical step. Do not rely fully on the pull chain or wall switch. Locate the circuit breaker that controls your ceiling fan and switch it to the “off” position. Consider tagging it to prevent accidental re-engagement.
  • Test for Power: After turning off the breaker, flip the wall switch or pull the fan chain to confirm the power is indeed off. The fan should not turn on.
  • Use a Sturdy Ladder: Ensure your ladder is stable and placed on a level surface. Have someone spot you if possible, especially when working at height.
  • Clear the Area Below: Remove any furniture or fragile items from directly beneath the fan to prevent damage if a blade is accidentally dropped.

Identifying Your Hunter Fan’s “No Screw” Blade Attachment Type

Hunter offers several innovative blade attachment systems that eliminate visible screws, making installation and removal quicker. Knowing which type you have is key to successful removal. Carefully examine how your fan blades connect to the motor housing.

  • Keyhole Slot / Slide-On Blades:
    • Appearance: The blade arm (the metal bracket that holds the blade) will have two or more keyhole-shaped slots where it meets the motor housing. You might see screws already inserted into the motor housing that the blade arm slides onto, then shifts to lock into place.
    • Mechanism: The blade arm slides onto screws that are partially loosened or pre-installed, then a slight shift or turn locks it in place.
  • Quick-Install / Snap-On Clips:
    • Appearance: You won’t see any screws at the attachment point. Instead, the blade arm might have a plastic or metal tab that snaps directly into a slot on the motor housing.
    • Mechanism: These blades often click directly into place. There might be a small tab or lever on the blade arm or motor housing that needs to be pressed or squeezed to release the blade.
  • “Hidden” Screws:
    • Appearance: Sometimes, screws are present but are concealed by a decorative cap or are located in a less obvious position on the blade arm or motor housing. This is less common for “no screw” marketing but worth a double-check if other methods don’t seem to apply.
    • Mechanism: Requires removing a cover or looking from a different angle to locate the screw heads.

Once you’ve identified your blade attachment type, proceed to the corresponding removal instructions.

Method 1: Removing Keyhole Slot / Slide-On Blades

If your Hunter fan blades attach via keyhole slots, follow these steps to safely remove them:

  1. Support the Blade: With one hand, firmly support the fan blade you intend to remove. This prevents it from dropping once disengaged.
  2. Locate Mounting Screws: Look for the screws that the blade arm slides onto. These will be partially threaded into the motor housing.
  3. Loosen, Don’t Remove: Using a Phillips head screwdriver, loosen these screws by a few turns. Do not remove them completely, as the keyhole slot needs the screw head to slide out.
  4. Slide and Lift: Once the screws are loose enough, gently slide the blade arm away from the motor housing until the wider part of the keyhole slot aligns with the screw heads.
  5. Detach Blade: With the screws aligned, carefully lift the blade arm straight off the screws.
  6. Repeat: Continue this process for each remaining blade.

Method 2: Removing Quick-Install / Snap-On Blades

For Hunter fans with quick-install or snap-on blade mechanisms, the removal process usually involves pressing a release tab or lever.

  1. Support the Blade: Just like with keyhole slots, firmly support the fan blade from underneath.
  2. Locate the Release Tab/Lever: Carefully examine the point where the blade arm connects to the motor housing. Look for a small, often discreet, plastic or metal tab, button, or lever. It might be on the top, bottom, or side of the blade arm, or recessed into the motor housing.
  3. Press/Squeeze and Detach: With one hand supporting the blade, use your other hand (or a small, flat-head screwdriver if needed) to gently press, squeeze, or push the release tab/lever.
  4. Slide/Pull Blade: While holding the tab/lever, gently slide the blade arm away from the motor housing or pull it straight down, depending on the specific design. The blade should disengage with minimal force.
  5. Repeat: Proceed to remove the remaining blades using the same method.

Tip: If you’re struggling to find the release mechanism, gently try wiggling the blade arm while looking for any part that flexes or seems to be a movable button. Referencing your fan’s original product manual can be available in Hunter ceiling fan manuals, which can also provide precise instructions for your specific model.

Reinstalling Your Hunter Fan Blades

Once you’ve completed your maintenance tasks, reinstalling the blades is typically the reverse of the removal process.

  • Keyhole Slot Blades: Align the wider part of the keyhole slots on the blade arm with the screw heads on the motor housing. Slide the arm onto the screws, then shift it to lock into the narrower part of the slot. Tighten the screws securely, but do not overtighten.
  • Quick-Install Blades: Align the blade arm with the corresponding slot on the motor housing. Push or slide it firmly until you hear an audible “click,” indicating it’s securely latched. Give it a gentle tug to ensure it’s locked in place.

Always ensure all blades are securely attached before restoring power to the fan.

Troubleshooting and When to Call a Professional

Even with these instructions, you might encounter some challenges. Here are a few common issues and when it’s best to seek professional help.

  • Blades Seem Stuck: If a blade isn’t detaching easily, double-check that you’ve correctly identified the mechanism and are applying force in the right direction (slide vs. pull). Ensure no hidden screws or clips are missed. Avoid excessive force, as this can damage the blade arm or motor housing.
  • Can’t Identify the Mechanism: Hunter has many models. If you’re truly unsure about your specific fan’s attachment method after careful inspection, consult your fan’s manual or look for the Hunter Ceiling Fan Model Number for diagrams or specific instructions.
  • Damage Suspected: If you notice any bent blade arms, cracked plastic components, or feel resistance that suggests damage, do not force the removal. This could worsen the problem and potentially affect fan balance or safety.

If you’re unable to safely remove the blades or suspect underlying damage, it’s always best to contact a qualified electrician or a professional ceiling fan repair service. They have the expertise and tools to handle complex issues safely.

Keep Your Hunter Fan Running Smoothly

Removing Hunter ceiling fan blades without visible screws is a manageable task once you understand the specific mechanism your fan uses. By following these detailed steps and prioritizing safety, you can confidently maintain your fan for cleaning, replacement, or even a style refresh. This hands-on maintenance extends the life of your fan and ensures it continues to provide comfortable airflow and enhance your home’s aesthetic.

Filed Under: Hunter Ceiling Fan Troubleshooting

Hunter Fan Remote Replacement 99600

May 13, 2025 by admin Leave a Comment

If you’re facing issues with your Hunter ceiling fan remote model 99600 or simply need a replacement, don’t worry! This article will guide you through replacing your Hunter fan remote, troubleshooting common issues, and installing a new remote. Whether you’re upgrading to a new model or just need to replace a faulty remote, we’ll ensure you have all the information you need to keep your fan running smoothly.

Hunter Fan Remote 99600

1. Where to Buy the Hunter 99600 Ceiling Fan Remote

If your Hunter ceiling fan remote is broken, lost, or malfunctioning, purchasing a replacement remote is simple. The Hunter 99600 ceiling fan remote is available for purchase online. We recommend using the Amazon link to buy the Hunter 99600 replacement remote, as it is quick, reliable, and includes fast shipping:

Buy the Hunter 99600 Ceiling Fan Remote on Amazon – Affiliate Link

2. Features of the Hunter 99600 Ceiling Fan Remote

The Hunter 99600 Ceiling Fan Remote is designed to work with most Hunter ceiling fans and offers the following features:

  • Multi-Speed Control: Allows you to adjust your fan’s speed across three settings (low, medium, high).
  • Full-Range Light Operation: Includes a wall switch access plate, allowing you to adjust the lighting and ambiance.
  • Easy Setup: Works with most ceiling fans, provided the receiver fits inside the fan canopy.
  • Universal Compatibility: It works with other fan brands as long as the receiver is compatible.

With the Hunter 99600 remote, you’ll enjoy convenient fan control from anywhere in the room.

3. How to Install the Hunter 99600 Ceiling Fan Remote

Here’s a brief overview of how to install the Hunter 99600 Ceiling Fan Remote:

  1. Turn off the power to your ceiling fan at the wall switch or circuit breaker.
  2. Remove the fan canopy to expose the receiver.
  3. Disconnect the old receiver (if replacing it) and note the wiring.
  4. Install the new receiver by connecting the wires according to the instructions.
  5. Replace the canopy and ensure everything is secure.
  6. Insert the battery into the remote control and pair it with the fan.

For a more detailed guide on installation, check out our helpful article: How to Install a Hunter Ceiling Fan Remote Control.

4. Troubleshooting Common Issues with the Hunter 99600 Remote

If your Hunter 99600 ceiling fan remote is not working properly, there are a few common issues that can be easily fixed. Instead of looking elsewhere, we have you covered with a detailed guide for troubleshooting. You can check out our Hunter Ceiling Fan Remote Not Working guide for step-by-step solutions.

Common problems include:

1. Unresponsive Remote

  • Ensure the battery is properly installed and has charge. If not, replace the battery with a new one.
  • Check the battery compartment to ensure proper contact.

2. Fan Not Responding to Remote

  • Ensure the fan is powered on and within range of the remote. Try re-pairing the remote with the fan by following the pairing instructions in the manual or our linked guide.

3. Light Control Issues

  • If the light on the fan isn’t responding, check whether the light bulbs are installed correctly. Additionally, test the light dimming feature to ensure it is working as expected.

5. Alternative Solutions

If you’re unable to get the Hunter 99600 remote working or if it’s no longer available, there are a few alternative options:

1. Universal Remote Control Kits

  • You can find universal ceiling fan remote kits that work with most brands, including Hunter. These remotes typically come with three-speed control, light dimming, and fan direction settings.

2. Purchase a New Replacement Remote

  • If the Hunter 99600 remote is no longer available, you can purchase a universal ceiling fan remote that will work with Hunter fans. Make sure the remote you choose is compatible with your fan model.

6. Conclusion

Replacing or troubleshooting your Hunter 99600 remote doesn’t have to be a hassle. Whether you need to replace a faulty remote or simply need a guide to get your fan working again, we’ve covered all the necessary steps. If you’re looking for a replacement remote, we recommend checking Amazon for a quick and easy purchase.

Remember, if you face any issues with your remote, consult our detailed Hunter Ceiling Fan Remote Not Working guide, and keep your fan running smoothly.

For more tips on Hunter fan parts, repairs, or replacements, visit our Hunter Ceiling Fan Replacement Parts Guide.

Filed Under: Hunter Ceiling Fan Parts, Hunter Ceiling Fan Troubleshooting

Hunter Ceiling Fan Wiring Diagrams: A Complete Guide

May 7, 2025 by admin Leave a Comment

When installing or maintaining your Hunter ceiling fan, understanding the wiring diagram is essential for safe and efficient operation. Wiring diagrams ensure that each component of the fan is connected properly, preventing electrical issues and ensuring the fan runs smoothly. In this guide, we will explore the wiring basics for various Hunter ceiling fan models, from standard models to those with light kits, remotes, and smart technology.

Whether you’re installing a new ceiling fan, troubleshooting wiring issues, or replacing components, this guide will provide all the information you need to get the job done right. We’ll cover everything from the essential wire connections to detailed wiring diagrams for advanced fan features.

Understanding Hunter Ceiling Fan Wiring

Before diving into the wiring diagrams, it’s important to understand the basics of ceiling fan wiring. Hunter fans typically feature three main types of wires: hot, neutral, and ground. These wires allow the fan to operate, power the lights, and ensure safety during installation. Here’s a quick overview of the typical wire colors:

  • Black wire: The hot wire, which carries the electrical current to the fan motor and light kit.
  • White wire: The neutral wire, which completes the electrical circuit.
  • Green or bare wire: The ground wire, used to protect against electrical shock by directing excess electricity safely into the ground.

Hunter ceiling fans also often feature remote controls, light kits, and Wi-Fi compatibility in newer models, adding additional components to the wiring setup.

Hunter Ceiling Fan Wiring Diagram for Standard Models

General Wiring for Basic Hunter Ceiling Fans (No Light Kit)

For a standard Hunter ceiling fan (without a light kit), the wiring setup is straightforward. Here’s a basic rundown of how to wire the fan:

  1. Turn off the power: Ensure that the electricity to the ceiling fan is turned off at the breaker box.
  2. Connect the wires:
    • The black wire from the fan should be connected to the black wire from the ceiling (hot wire).
    • The white wire from the fan should be connected to the white wire from the ceiling (neutral wire).
    • The green or bare wire from the fan should be connected to the ground wire from the ceiling (usually green or copper).

Once these connections are made, the fan will be ready for use, and you can test it by turning the power back on.

Wiring Diagrams for Hunter Ceiling Fans with Light Kits

hunter fan light switch

If your Hunter fan comes with an integrated light kit, you will need to connect the light wires in addition to the fan motor wires. Typically, the setup is as follows:

  • The black wire connects to the fan motor.
  • The blue wire is typically used to connect to the light kit.
  • White wires (neutral) are common for both the fan and the light kit.
  • The green or bare wire is used for ground connections.

When you wire the fan and light kit together, you should ensure that the light is wired to the same hot wire (black) or use the blue wire for the light separately, depending on the specific model.

These wiring diagrams for fans with light kits often come in the product manuals or can be found on the Hunter ceiling fan manuals section of the Hunter Fan website.

Hunter Ceiling Fan Wiring Diagrams for Advanced Features

Wiring for Remote-Controlled Ceiling Fans

For ceiling fans equipped with remote control functionality, the wiring setup includes an additional component – the receiver. The receiver connects to the fan motor and the remote, allowing you to control the fan speed and light settings from a distance. Here’s how you wire it:

  1. Receiver: The receiver connects to the hot wire from the ceiling (black) and is powered by the white neutral wire.
  2. Fan Motor: Connect the black wire from the fan to the corresponding receiver wire.
  3. Light Kit: If you have a light kit, connect the blue wire to the receiver and hot wire from the fan.

Remember to check your Hunter ceiling fan remote for model-specific instructions. The wiring diagram will vary depending on whether you’re using a wall switch, remote, or smart control system.

Smart Fan Wiring for Wi-Fi Enabled Fans (SimpleConnect)

If your Hunter fan has Wi-Fi functionality (like the SimpleConnect feature), the wiring is very similar to that of remote-controlled models, but with additional steps for integrating the fan into your smart home system. The primary difference lies in the receiver that allows the fan to connect to your Wi-Fi network.

  • Wi-Fi Receiver: Install the receiver in the same manner as the remote-controlled model, with a connection to the hot and neutral wires.
  • Smart Integration: After installation, the fan connects to your home Wi-Fi network, allowing you to control the fan via an app, Alexa, or Google Home.

If you need help with this process, check out our Hunter SimpleConnect smart ceiling fans post for a detailed guide.

Common Wiring Issues and Troubleshooting

While wiring your Hunter ceiling fan, you may encounter a few common issues. Here are some troubleshooting tips:

  • Fan not turning on: Double-check your wiring connections. Make sure the hot wire is properly connected to the fan and light kit.
  • Light not working: If the fan works but the light doesn’t, ensure that the blue wire is connected correctly to the light kit.
  • Fan speed issues: If the fan operates but the speed isn’t right, check the remote control receiver or verify the wire connections for the motor.

If you encounter issues, be sure to refer to our article on Hunter Ceiling Fan Troubleshooting for further guidance.

How to Access and Read Hunter Ceiling Fan Wiring Diagrams

You can easily access Hunter ceiling fan wiring diagrams from several sources:

  • Hunter Ceiling Fan Website: Navigate to the parts and manuals section to find the wiring diagram for your specific fan model.
  • Manuals: Check the manual provided with your fan or available online.
  • Hunter Ceiling Fan Manuals: For easy access to wiring diagrams and more detailed instructions, visit our Hunter ceiling fan manuals page.

Conclusion

Understanding the wiring diagram of your Hunter ceiling fan is crucial for ensuring a safe and efficient installation. Whether you’re wiring a basic model, adding a light kit, or setting up a remote-controlled or smart ceiling fan, following the correct wiring instructions will prevent issues and ensure your fan runs smoothly. Always ensure that you’re using the appropriate diagram and that the wiring matches the manufacturer’s instructions.

For more information on wiring Hunter ceiling fans, check out our detailed guides on wiring a Hunter ceiling fan with light kit and Hunter ceiling fan troubleshooting.

Filed Under: Hunter Ceiling Fan Troubleshooting

  • « Previous Page
  • 1
  • 2
  • 3
  • 4
  • …
  • 8
  • Next Page »


Best Hunter Ceiling Fans

Bestseller No. 1 Hunter 59244 Dempsey Ceiling Fan 44 inches Fresh White
Hunter 59244 Dempsey Ceiling Fan 44 inches Fresh White
Check Price
Bestseller No. 2 Hunter 53090 Builder Deluxe Ceiling Fan 52 inches Brushed Nickel
Hunter 53090 Builder Deluxe Ceiling Fan 52 inches Brushed Nickel
Check Price
Bestseller No. 3 Hunter Fan Company Fan Builder Elite Indoor Ceiling Fan with Pull Chain Control, Metal, New...
Hunter Fan Company Fan Builder Elite Indoor Ceiling Fan with Pull Chain Control, Metal, New...
Check Price

Recent Posts

  • Hunter Ceiling Fan Remote Control Manual
  • Hunter Ceiling Fan Flickering Lights: Causes and Fixes
  • Hunter vs Kichler Ceiling Fans — The Ultimate Battle for Your Ceiling
  • Hunter Fan Company Phone Number & Contact Information (Official Guide)
  • Hunter HVLS Fans: The Definitive Guide to High-Volume, Low-Speed Airflow
  • Hunter 99373 vs 99375: What’s the Difference Between These Remotes?
  • Hunter Fan Remote Battery Replacement
  • Hunter 99123 Fan Remote Troubleshooting & Manual
  • How to Unpair Your Hunter Fan Remote
  • How to Install Hunter Low Profile Ceiling Fan

Legal Information

This site is owned and operated by HunterCeilingfans. Hunter ceiling fans is a participant in the Google Adsense Program, an advertising program designed to provide a means for sites to earn advertising fees by displaying related advertisements.

Hunter ceiling fans also is a participant in Amazon Associates Program. “As an Amazon Associate, I earn from qualifying purchases.”

Hunter ceiling fan is compensated for referring traffic to these companies. Hunter ceiling fans is an independent site with no connections to Hunter and is operated entirely by independent volunteers and writers to provide information.

We are not the manufacturer of Hunter Ceiling Fans, nor are we associated with Hunter in any way. We are a third-party resource website that tries to help site visitors to find valuable information.

Categories

  • Discontinued Hunter Ceiling Fans
  • Hunter Ceiling Fan Parts
  • Hunter Ceiling Fan Reviews
  • Hunter Ceiling Fan Support
  • Hunter Ceiling Fan Troubleshooting
  • Hunter Ceiling Fans
  • Hunter Fan Manuals

Partners

Harbor Breeze