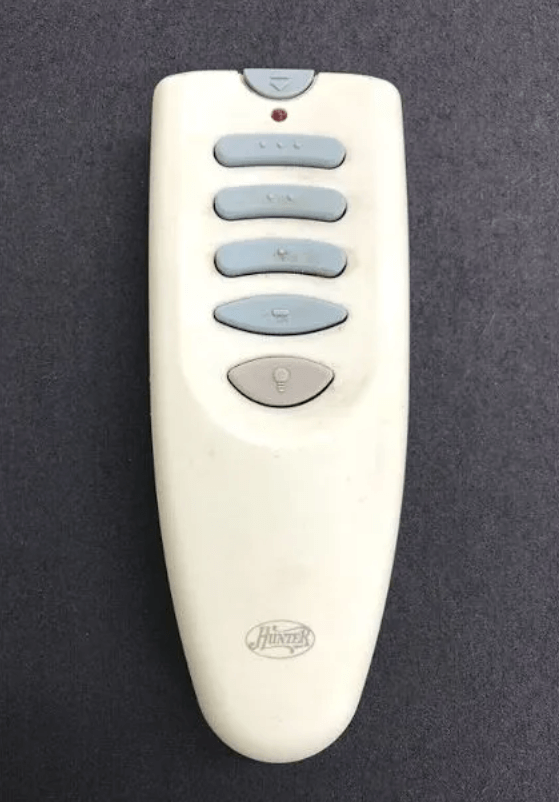
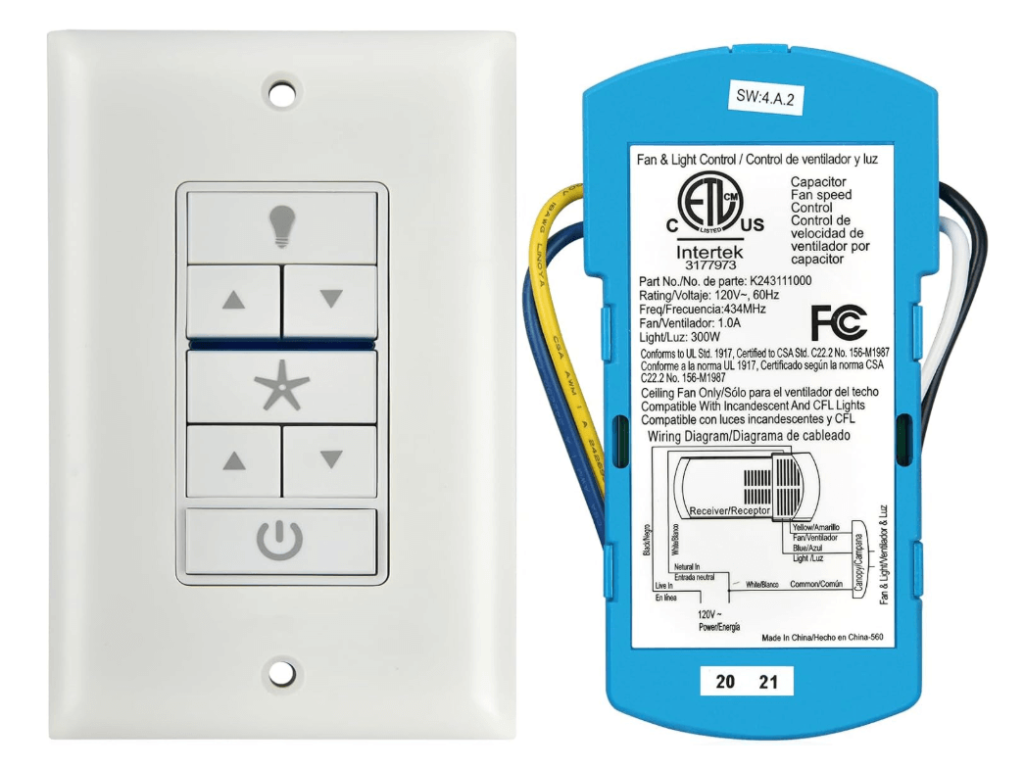
Hunter Ceiling Fans

  • Home
  • Hunter Manuals
  • Hunter Ceiling Fan Parts
    • Hunter Ceiling Fan Remotes
    • Hunter Ceiling Fan Light Kits
    • Hunter Ceiling Fan Blade Arms
    • Hunter Ceiling Fan Blades
    • Hunter Ceiling Fan Downrods
    • Hunter Ceiling Fan Pull Chains
    • Hunter Ceiling Fan Wall Controls
    • Hunter Ceiling Fans Replacement Globes
  • Hunter Support

How do I clean my Hunter ceiling fan?

July 12, 2023 by admin Leave a Comment

Prepare the ceiling fan and area below for cleaning

The first step is to make the area ready. You should put down some old sheets or whatever rags you put under the fan to catch the dust and dirt. The area you need to recover is not only under the fan, but an area about twice the width of your fan.

First, place a drop cloth or similar material under the fan to catch dust and dirt. Ensure that there is no furniture directly under the fan to avoid any damage. Next, set up your ladder in a position where you can easily access the top of the blades.

Remove both the light kits and light globes to prevent them from getting dirty during the cleaning process. In fact, consider taking them down entirely so that you can clean them thoroughly as well. This way, you’ll have a spotless fan and clean light fixtures when you’re done.

Cleaning your Hunter Ceiling Fan

Now that the area is prepped and ready, you can start cleaning your Hunter fan! The most effective method is to use a specialized brush designed for this purpose. These brushes are versatile and can be used for various tasks. With their telescoping arm and u-shaped design, they are perfect for reaching and cleaning hard-to-reach places, making them ideal for ceiling fans.

These cleaning duster u-shaped brushes are not only affordable but also serve multiple purposes, making them a smart investment for any homeowner or ceiling fan enthusiast.

So, go ahead and get yourself one of these brushes to keep your Hunter fan in top-notch condition!

EVERSPROUT 5-to-12 Foot Flexible Microfiber Ceiling & Fan Duster

This nifty duster can access 5-12 ft and is even machine washable, making it a convenient and cost-effective tool for cleaning your Hunter ceiling fan.

Once you have the right tools, it’s time that you begin cleaning. Start by wiping both sides of the fan blades thoroughly to remove any accumulated dust.

If your Hunter ceiling fan has light globes, use a screwdriver to take them down and hand wash them in the sink. Before re-attaching the light kit or globe, ensure that the globe is completely dry.

To prevent dust from sticking to the blades in the future, one site visitor recommended using car wax. While we’re not certain about the exact amount of car wax to apply (likely just a little bit), it’s an interesting idea worth trying. If you give it a shot, do let us know how it works out for you and your Hunter ceiling fan!

Important Notes:

  • Avoid spraying water or any liquid directly onto the fan blades.
  • You can use an all-purpose cleaner along with a cloth or sponge to wash the blades.
  • Be gentle and avoid applying too much pressure to prevent bending the fan blades during cleaning.

Filed Under: Hunter Ceiling Fan Support Tagged With: ceiling fan maintenance, how to clean ceiling fan, how to clean hunter ceiling fan, Hunter ceiling fan dust wander

How to Install a Hunter Ceiling Fan Light Kit

July 10, 2023 by admin Leave a Comment

So, you have made the decision to add a light kit to your Hunter ceiling fan?

Adding a light kit fulfills the lack of lighting in the room but it also gives rise to the beauty of the room. A light kit by Hunter fan can kill two birds with one stone and this accessory is very important in this regard. Hunter fan with light can enlighten the dark room and add a cooling effect to your space. if you do not know that you can warm a room in the winter months using a ceiling fan, you should go through the ceiling fan direction. It will be worth it.

Before you buy a Hunter ceiling fan light kit to mount onto your fan, the first thing to find out is that it is compatible with your fan.

Generally, you can make sure that the light kit is compatible with your model by going through the product description of the lighting fixture. The description will state that it is compatible with these models (numbers) etc.

If you find no details on the product, a description of the compatibility of the item, it is our recommendation to leave it and go for another one.

The light kits are available in bulk and it does make sense to do some research before you buy them right?

Installing a Hunter Ceiling Fan Light Kit – Step-by-Step Guide

  1. The main and first objective should be to make sure that electricity is turned off to the fan. the process does not only include the switching off the switch on the wall but also the main power breaker. Turn on or off the fan to ensure and double check that the power is gone.
  2. After that, inspect the housing assembly. Usually, it is not visible and hidden under the cover in the middle of fan. To expose the wiring, remove the middle plate and inspect the wires that you require. You need to find the white wire and black wire which are not attached to anything. Find a wire that is named lighting power. If both wires are available, you can get started.
how to install a hunter ceiling fan light kit
Hunter Light Kit Installation

The above pictures show the removal of the cover on our Hunter ceiling fan to inspect the wire colors we need.

  • Step on a ladder, to begin with, the working, and pull the fan down. The task is simple and easier when it comes to pulling down a fan and working on it than to light kit installation with it hanging from the ceiling.
  • After that, connect the lighting fixture wires first and to keep them in place, use the wire nuts. The white wire goes to the white wire and black to black.
  • After connecting the wires successfully, you can attach the lighting kit physically to the fan.
  • Once the light kit and the wires are connected physically, the next step is to re-attach the center plates if available as required and put back the screws in.
  • If the light kit contains light bulbs, pull chains, or shades, you can complete the installation by fastening them too.

Are Hunter ceiling fan light kits interchangeable?

Hunter ceiling fans also have universal light kits and they sell them as universal. Hunter light kits are only interchangeable with Hunter ceiling fans because they are universal to their own ceiling fans.

What’s Next

Hunter Ceiling Fan Installation Instructions

How to Replace Hunter Ceiling Fan Capacitor

How to Remove a Canopy Trim ring on a Hunter Ceiling Fan

Filed Under: Hunter Ceiling Fan Support Tagged With: how to install hunter ceiling fan light kit, Hunter ceiling fan light kit, Hunter ceiling fan light kit installation

How to Replace Hunter Ceiling Fan Capacitor

July 5, 2023 by admin 2 Comments

Capacitors are a part and parcel of a ceiling fan. Hunter fans also contain them. Like all electrical parts, capacitors can also stop working. That is why if your ceiling fan capacitor is not working, you must replace it.

That leads us to the question, how to replace Hunter ceiling fan capacitor?

The first step to begin the process is to get the essential tools. The next step is to switch off the electricity from the circuit. And now you can start removing the old capacitor and adding a new capacitor to the fan.

We will try our best to make this guide good enough for any user to perform the task by himself. The process is not that hard.

Here are some Hunter Capacitors

Replacing a Hunter Ceiling Fan Capacitor –  Full Guide

We have provided the whole procedure of changing a Hunter ceiling fan capacitor below. The wiring diagram will also be added for your convenience.

1. Obtaining Essential Tools

The first step is to obtain a couple of parts and equipment for the procedure. The components are listed below.

List of Necessary Equipment and Components:

  • Voltage Tester
  • Replacement Capacitor
  • Wire Stripper
  • Electrical Tape
  • Wire Nuts
  • Rubber Gloves and Boots

Before you start the process, it is the best thing to get an adequate capacitor for your fan. it should be rated for your Hunter ceiling fan.

If you do not do this process, it will not work, and it can also damage your unit. The appropriate rating can be determined from the body of the old capacitor or from going through online guides.

2. Turning Off the Power

If you want to know how to replace Hunter ceiling fan capacitor, the first step is to turn off the electricity from the circuit on which it operates. The live wires are extremely dangerous to work with.

How to turn off the power?

  • To avoid electrical accidents or hazards, use gloves and rubber boots for safety purpose.
  • Find the main breaker of your home and find out which breaker is supplying current to your Hunter ceiling fan you are about to work on.
  • After identifying the accurate breaker, flip the switch in order to switch off the power.
  • To make sure that the power has turned off, use the voltage tester.
  • After making sure that the electric current is ceased to flow to your unit, you can go ahead for the next step that is, remove the old capacitor.

3. Removing the Old Capacitor

We have to remove the old capacitor before we start installing the new capacitor. We have discussed this in detail below.

*Note: Every model is different from others and the procedure might be different for individual models. We have added the most general outline in this guide.

How to remove the old Hunter capacitor?

  • There is a tiny, black, rectangular box that is directly fixed to the switch houses the capacitor. If you ceiling fan has a lighting fixture, remove it to reach the fan motor and capacitor.
  • Unscrew the screws keeping the fixture secure that houses the unit, then remove the screws and take off the bulbs.
  • Disconnect the wires and take the fixture away from the fan.
  • When the motor will be exposed, the capacitor will be visible, which is usually installed near the pull chain switch if the fan contains one.
  • The capacitor may have 2-5 wires on it. the ideal way to separate the capacitor is by cutting the wires because the wires are fixed firmly to the motor components.
  • It is advised to cut as close to the capacitor as possible to save a lot of wire to install a new capacitor.
  • It is essential to keep in mind which wires are connected as the color coding on the unit may not be the same as that on the capacitor.

4. Wiring the New Capacitor

As we have already stated, the process may be different for a different model of Hunter. Therefore, we are going to give the basic wiring method for a Hunter fan. Here are the steps:

ceiling fan capacitor wiring diagram
Ceiling Fan Capacitor Wiring Diagram

Steps to installing a new Hunter fan capacitor:

  • The current flow to the switch from the positive cable and goes to the regulator and after that, to the connector. If a regulator is not available, you may connect it directly to the connector after the switch.
  • The negative wire comes directly to the connector.
  • The current flows to the switch using the positive cable and goes to the regulator and then reached the connector. If the regulator is not there, you will have to connect it to the connector directly and then the switch.
  • The connector directly gets the negative wire.
  • To make the connection secure, ensure the wires are stripped properly.
  • Now, connect the positive end of the Hunter capacitor to the positive terminal of the connector.
  • The ceiling fan’s positive wire also comes to this terminal.
  • The next task is to connect the other end of the capacitor to a blank terminal on the connector.
  • Then, connect it to the fan.
  • And lastly, connect the neutral wire of the ceiling fan to the neutral terminal on the connector.
  • Make sure that no wiring is exposed and that all the connections are secure.

How to Troubleshoot the Hunter Ceiling Fan Capacitor

Troubleshooting all electrical parts after installation is essential to ensure that they are functioning correctly. Otherwise, it can cause an electrical hazard.

We have added the steps that you need to perform to troubleshoot a new capacitor on a Hunter ceiling fan. These steps will be different from troubleshooting a Hunter ceiling fan.

How to troubleshoot a replaced capacitor?

  • Go to the main service panel to switch on the power.
  • To check the power, use a voltage tester to ensure the current is reinstated
  • Use any type of controller like pull chain, switch or remote to switch on your Hunter ceiling fan.
  • If the fan starts spinning, to determine whether you have enough control over the speed of the fan, you need to use the regulator.
  • If you receive a positive answer to this query, it means that you have properly installed it.
  • If you experience the opposite, it is better to check the wiring to find out if they are carried out in an appropriate manner.

Last Words

All the essential steps are discussed in this guide on replacing the Hunter ceiling fan capacitor.

Apart from installation, the troubleshooting guide after installation is also mentioned in this article. You can always choose to get help from a qualified person instead if you are not confident or confused about any step. Keep in mind that electrical operations are difficult as well as dangerous if you perform them without the proper information.

Filed Under: Hunter Ceiling Fan Support

How to Oil a Hunter Ceiling Fan

July 4, 2023 by admin Leave a Comment

The Hunter Original® fans have become the apple of the eyes of the house owners from the very beginning. Hunter Original fan came into existence in 1906, designed for durability and equipped with cast iron materials and a motor that functions with the help of an oil bath lubrication. While other ceiling fans from hunter do not need oiling, Hunter original is the exception due to its unique motor system causes the main bearings to stay lubricated to operate quietly all the time.

The system has been working for over 135 years. Having said that, adding and replacing the oil in the Original ceiling fan by Hunter is necessary. Here’s an easy guide on how to oil a Hunter ceiling fan.

How to Oil a Hunter Ceiling Fan During Installation 

Your fan will be shipped without oil in the motor, so you will have to add oil before you start using it.

You need to locate a tube of Hunter high-grade SAE 10 non-detergent oil packaged in the hardware bag. It is imperative that you use Hunter’s oil because the wrong oil can damage the fan.

Things Needed to Oil the Hunter Original Ceiling Fan 

  • Hunter oil for model
  • Step ladder
  • Screwdriver
  • Scissors for cutting the tip on the tube of oil
  • Pipe cleaner
  • Hunter Fan product manual

Oiling the Model #51123

hunter oil bottle

  1. Open the oil cap and cut the tip off from the end of the tube.
  2. The next step is to lift the cap of the oil hole to the oil reservoir located at the top of the unit.
  3. Now, put the tube into the oil hole and squeeze the tube gently to empty the oil into the reservoir of the fan.

oil hole and oil bottle

  1. after filling the reservoir, the next thing is to check the oil level immediately to make sure it’s filled properly (follow the instructions in this guide on how to check your fan’s oil level).
  2. After filling the reservoir, replace cap


TIP: To prevent overflowing during filling, it is ideal to add a third of the oil from the tube at a time. Wait for 30 seconds between each third so the oil gets settled in the fan. You need to ensure that you add all the oil in the tube to the fan.

How do you Lubricate a Hunter Ceiling Fan When Moving its Location 

If you need to move your Hunter original fan, you have to remove the existing oil from the fan to avoid spilling it. Take and utilize the original hanging system in your new space but if it requires replacement, you need to get a relocation kit of Hunter for that.

After completing the installation once again, follow the above steps to refill the oil in the Anniversary edition or original fan.

How to Check the Oil Level in Your Hunter Original Fan

To maintain the best performance of the unit, Hunter’s experts suggest you check the oil level in your unit every 1-5 years, even if the fan is working fine.

If your Hunter ceiling fan is making a noise, it could be happening due to several reasons, one of them is needing oil.

Follow these simple steps to check the oil level:

  • Firstly, switch off the power to the fan
  • Bend a ½-inch hook on one end of a basic pipe cleaner
  • Dip the hook into the oil reservoir
  • Get rid of the pipe cleaner and examine that if the oil has touched the end of the hook

If the pipe cleaner contains oil on it, that shows the reservoir is full.

If the pipe cleaner does not have oil on the end, add more oil until you repeat Step 4 and check and see the oil on the pipe cleaner.

pipe cleaner

Where to Get Oil for Your Hunter Original Fan 

After getting solution for how to oil a hunter original fan the next thing is where to find it.

Hunter’s 1 oz. tube of Hunter high-grade SAE 10 non-detergent oil is especially available to give the unique oil bath lubrication system of the Hunter Original® ceiling fans for a lifetime of noiseless function. If you will use the wrong oil, it can damage the fan, so make sure you use our recommended oil designed for the Hunter original fan to make its rotation smooth. We have added the link to the oil above to purchase.

Maintaining the oil level in your Hunter Original fan does not need a lot of effort or time and the maintenance of the oil can give long-lasting, quality performance that you can rely on to get the comfort you are looking for.

Filed Under: Hunter Ceiling Fan Troubleshooting Tagged With: How to Lubricate a Hunter Ceiling Fan, how to oil hunter ceiling fan, hunter ceiling fan making noise

How To Install A Hunter Ceiling Fan With Remote

July 4, 2023 by admin Leave a Comment

Modern architecture will be compatible with modern technology, is not it?

Just remember that Hunter has remote control ceiling fans that can complement your modern-age living area with light too. But, how to install a hunter ceiling fan with remote? How to install a hunter ceiling fan with light?

Well, it might seem difficult to you but the installation of a ceiling fan is a straightforward task.

Firstly, you have to take down your existing fixture first. Then, install the ceiling fan bracket and wire it. After doing so, install the components including canopy, blades and a light kit if it is available.

This guide will help you to understand and you will be able to install hunter ceiling fan with remote so that you can do it the right way.

Let’s get started!

A Guide to Install a Hunter Ceiling Fan with Remote

As we already mentioned that hunter ceiling fans installation is not very complicated as it seems. Your task is to follow the steps given in the owner’s manual with the required tools.

Tools Required

Here’s a list of tools and supplies that will need to install the hunter ceiling fan with remote to do the proper installation and safely.

  • Ladder
  • Screwdriver
  • Plier
  • Wire stripper
  • Wire tester
  • Electric drill machine
  • 9/64’’ drill bit

Once you have gathered all the tools, you are ready to begin the process. Here is a step-by-step guide you need to follow:

Ready to Get Started

Before you begin the installation of the fan, you need to ensure that the distance of the fan is safe from other walls and floors. The blade tips of the unit should be at least 30-inch clearance from the nearest barriers.

Switch off the power from the main circuit breaker that supplies power to the room as well as the wall switch for your safety.

If you are not new in that house, it is more likely that there is already an existing fan installed there. In this case, you need to take it down first. Disconnect the nuts and wires that are mounted to the ceiling.

Install the Ceiling Bracket

To make sure that the ceiling fan is safely affixed to the ceiling, you should use the Hunter bracket kit that is packed with hunter ceiling fan remote control.

You have to install the bracket to a box that is affixed between the joints or put it within a brace that is connected between the joints.

How to install a ceiling bracket:

  • Reveal the pre-installed screws from the motor adaptor.
  • Tighten the downrod and comes through the wires of the fan through the down rod.
  • Cut the extra length of the wires (8-inch from the down rod), now, strip 3/8 of an inch of the wires from the top.
  • After that, tight the screws to the motor adaptor again. Now, attach the canopy that passes the wires and downrod.
  • Lastly, place the down rod ball into the correct slot within the ceiling bracket.

Wiring the Ceiling Fan

Now, begin with wiring the Hunter ceiling fan with remote control. Put the bare metal ends of the two wires together to fix with a wire nut first. After that, tighten the nuts by rotating them clockwise.

Most Hunter fans are packed with preinstalled remote receivers that already have receivers installed. Advanced engineering can make your task simple.

If you have a single wall switch, you need to follow these steps:

  • Link the ground wire (white in color) from the ceiling to the ground wire of the unit.
  • Link the black wire (ungrounded) that is revealed from the ceiling to the black wire of the fan.
  • Link the green, green/yellow stripe, and bare copper wire with the wire nut which is coming from the ceiling, downrod, and ceiling bracket.
  • The blue wire is not needed that come out from the fan for single switch wiring.

If you have a dual wall switch, you have to link the other ungrounded wire to the blue wire from the unit using a wire nut. The rest of the wiring will remain the same.

Now, if your Hunter fan does not come with a remote receiver pre-installed, you’ll have to wire it with a separate remote receiver. Here’s how you will do it.

  • Connect the yellow wire of the receiver to the black wire of the unit.
  • Connect the blue wire from the fan to the blue wire of the receiver.
  • Link the black wire of the receiver to the black wire of the ceiling.
  • Now, connect the grounded wire which is white in color from the ceiling to both the white wire of the receiver and fan.
  • Lastly, connect the three wires getting out from the ceiling, downrod, and ceiling bracket.

hunter wiring with remote control

Install Canopy or Motor Housing

You will need a canopy installation if the unit you are going to use needs a downrod. To install the canopy, you need to place the wires into the junction box first. After that, lift the canopy into the required place to insert and tight the canopy screws with the help of a screwdriver.

Alternatively, to install a low profile Hunter Ceiling Fan, you’ll have to install the motor housing. Tuck the wire nuts together into the junction box for the sake of installation.

Then, pick up the motor housing and check the alignment of the screw holes with the holes of the ceiling bracket. Now, insert the screws and tight the motor housing screws.

Install Fan Blades

After completing the installation of the canopy or motor housing, the next task is to attach blades. Hunter fans provide all the needed instruments to fix the blades.

First of all, you need to insert the grommets into the holes of every blade. Then, use the screws to secure the blades to their blade irons

After that, use the screws to place the blade arms to the motor and tighten their connection.

Install Light

Your Hunter ceiling fan remote control may include lighting in it. in this case, you have to install the lighting kit too.

But before you get started, you need to check if the fan you have contains a quick connect feature. It can be checked from the switch housing of that fan.

Fans with the Quick Connect feature are designed with a specific locking mechanism that is present in the switch housing. The rings are also surrounding the housing.

Install Remote Control

Hunter fans are replete with remote control features while handheld remote and wall controls arrive pre-installed with the unit.

A wall control remote will be installed at the wall switch. The process will make everyone remember that where to change the speed of the fan.

Alternatively, you can use handheld Universal fan remote control to control fan speeds levels right from the sofa, bed or anywhere in the room.

Some of the Hunter units remote are available with a feature to control the speed levels from the smartphone with the help of SIMPLEconnect app.

We hope that you have learned how you install Hunter ceiling fan with remote successfully. The duration of this process can take around 1-1.5 hours depending on your expertise.

However, if you aren’t confident enough to install the fan, it is highly recommended to call your nearest professional electrician to do the job.

Related Read: Hunter Fan Remote Not Working


Final Words

Keeping in view the advancement of technology, we want to control everything by remaining in our comfort zone by using the easiest ways, fingers. Hunter fans are the ideal choice when it comes to keeping yourself up to date with technology and aesthetics. So, we hope that this guide will enable you to learn how to install a hunter ceiling fan with remote properly.

Filed Under: Hunter Ceiling Fan Troubleshooting Tagged With: How to install hunter ceiling fan, install hunter ceiling fan

  • « Previous Page
  • 1
  • 2
  • 3
  • 4
  • …
  • 9
  • Next Page »


Recent Posts

  • Hunter Ceiling Fan Replacement Parts
  • Hunter Builder Deluxe Ceiling Fan Manual – Review, Comparison
  • Hunter Ceiling Fan Manuals & User’s Guides
  • Hunter Key Biscayne Ceiling Fan
  • How to Balance a Hunter Ceiling Fan

Legal Information

This site is owned and operated by HunterCeilingfans. Hunter ceiling fans is a participant in the Google Adsense Program, an advertising program designed to provide a means for sites to earn advertising fees by displaying related advertisements.

Hunter ceiling fans also is a participant in Amazon Associates Program. “As an Amazon Associate, I earn from qualifying purchases.”

Hunter ceiling fan is compensated for referring traffic to these companies. Hunter ceiling fans is an independent site with no connections to Hunter and is operated entirely by independent volunteers and writers to provide information.

We are not the manufacturer of Hunter Ceiling Fans, nor are we associated with Hunter in any way. We are a third-party resource website that tries to help site visitors to find valuable information.

Categories

  • Hunter Ceiling Fan Parts
  • Hunter Ceiling Fan Support
  • Hunter Ceiling Fan Troubleshooting