Why You Need the Hunter Ceiling Fan Balancing Kit
If you own a ceiling fan, you know how important it is for it to operate smoothly and quietly. A well-balanced fan ensures even airflow, reduces energy consumption, and operates quietly, providing comfort to your home. However, if your fan starts wobbling, making noise, or running unevenly, it can disrupt your comfort and even cause damage over time.
Hunter ceiling fans, known for their durability and performance, can sometimes experience these common issues, especially as they age or accumulate dust and debris. Fortunately, there’s a simple solution: the Hunter Ceiling Fan Balancing Kit.
In this guide, we’ll walk you through what the Hunter Ceiling Fan Balancing Kit is, how it can fix common issues like wobbling, and why it’s a must-have for anyone experiencing performance problems with their fan. Plus, we’ll give you tips on how to use it effectively and prevent these issues in the future, ensuring that your Hunter fan continues to provide comfort for years to come.
Whether you’ve noticed your fan making an annoying clicking sound or vibrating during operation, this guide will help you address these problems quickly and easily. Let’s get started by exploring the basics of the Hunter Ceiling Fan Balancing Kit and how it can transform your fan’s performance.
What Is the Hunter Ceiling Fan Balancing Kit?
The Hunter Ceiling Fan Balancing Kit is a specially designed toolset created to help you achieve smooth and balanced operation of your Hunter ceiling fan. It’s an essential accessory for fixing common fan issues, particularly when the fan begins to wobble or vibrate during use. This imbalance often leads to noise, reduced airflow efficiency, and a less-than-ideal overall experience.
A balanced ceiling fan operates quietly and efficiently, while an imbalanced fan can cause issues such as excessive noise, vibrations, and even damage to the fan’s motor. The Hunter Ceiling Fan Balancing Kit addresses these issues by providing the tools necessary to balance the blades and correct any wobbling or shaking.
Typically, the kit includes:
- Balancing Clips: These clips are attached to the fan blades to test for the source of the wobble.
- Weights: Small weights are included to attach to specific areas of the fan blades, helping to evenly distribute weight and achieve balance.
- Instructions: Easy-to-follow guidance that walks you through the balancing process, ensuring the fan is properly adjusted.
The kit is compatible with many Hunter ceiling fan models, offering a simple and cost-effective solution to a common issue that can affect the comfort and performance of your ceiling fan.
By using the Hunter Ceiling Fan Balancing Kit, you can restore the fan’s balance, improve its performance, and extend its lifespan. Whether you’re dealing with a noisy fan or an unsteady one, this kit ensures your ceiling fan runs smoothly, without the need for a professional repair technician.
Why You Should Use the Hunter Ceiling Fan Balancing Kit
1. Eliminates Wobbling and Noise Wobbling is one of the most common issues that ceiling fan owners face. An imbalanced fan doesn’t just wobble; it also creates unwanted noise that can be irritating, especially in rooms where you need peace and quiet. Using the Hunter Ceiling Fan Balancing Kit helps you eliminate this wobbling by balancing the blades, leading to a quieter fan operation.
2. Improves Airflow Efficiency An imbalanced ceiling fan doesn’t circulate air effectively, which can result in uneven temperatures in your room. By restoring balance to your fan, you ensure even airflow, enhancing your fan’s cooling and heating capabilities. A well-balanced fan can make your home feel more comfortable, especially in the summer or winter months.
3. Prevents Wear and Tear Wobbling and vibrations put undue stress on your ceiling fan’s motor and other components. Over time, this strain can cause the motor to wear out or other parts to break down, leading to costly repairs. By balancing the fan early on, you reduce the risk of these issues, helping your fan last longer and perform at its best.
4. Easy to Use and Cost-Effective The Hunter Ceiling Fan Balancing Kit is designed to be user-friendly, so you don’t need to be an expert to use it. You can quickly address wobbling and noise issues on your own, saving you time and money that you would have spent calling in a professional.
By using this balancing kit, you ensure your ceiling fan continues to operate smoothly, and you maintain the comfort and performance you expect from your Hunter fan. It’s a simple investment that can prevent more serious (and expensive) problems down the road.
Now that you know the importance of using the Hunter Ceiling Fan Balancing Kit, let’s dive into how to use it effectively to restore balance and performance to your fan.
Benefits of Using the Hunter Ceiling Fan Balancing Kit
- Eliminates Wobbling and Shaking The primary benefit of using a Hunter ceiling fan balancing kit is that it eliminates the wobbling and shaking that can occur when fan blades are out of balance. A balanced fan will spin evenly, making less noise and improving airflow efficiency.
- Reduces Wear and Tear When your ceiling fan is unbalanced, the motor has to work harder to keep the blades spinning. This added strain can lead to premature wear and tear on the motor and other internal components. Balancing the fan reduces the strain on the motor, helping it run more efficiently and extend the fan’s lifespan.
- Improved Noise Reduction Unbalanced blades often result in loud rattling or humming noises. The Hunter ceiling fan balancing kit helps fix these issues by stabilizing the fan blades, making your ceiling fan operate quietly—ideal for bedrooms, living rooms, or offices.
- Enhanced Comfort and Efficiency When your ceiling fan is balanced, it operates more efficiently. The airflow will be more consistent, providing a comfortable environment throughout the room. Plus, your fan will use less energy since it’s not working harder to compensate for imbalance.
How to Use the Hunter Ceiling Fan Balancing Kit
Using the Hunter Ceiling Fan Balancing Kit is a simple and straightforward process that can be completed in a few easy steps. Whether you’re a seasoned DIY enthusiast or someone new to fan maintenance, you’ll find this kit easy to use. Here’s a step-by-step guide to help you achieve a perfectly balanced ceiling fan:
Step 1: Turn Off the Power to Your Ceiling Fan
Before you begin, always ensure the power to the fan is turned off. This is a crucial safety step to prevent any electrical accidents while handling the fan blades and the balancing kit components.
- Tip: Use the wall switch or circuit breaker to turn off the fan’s power completely.
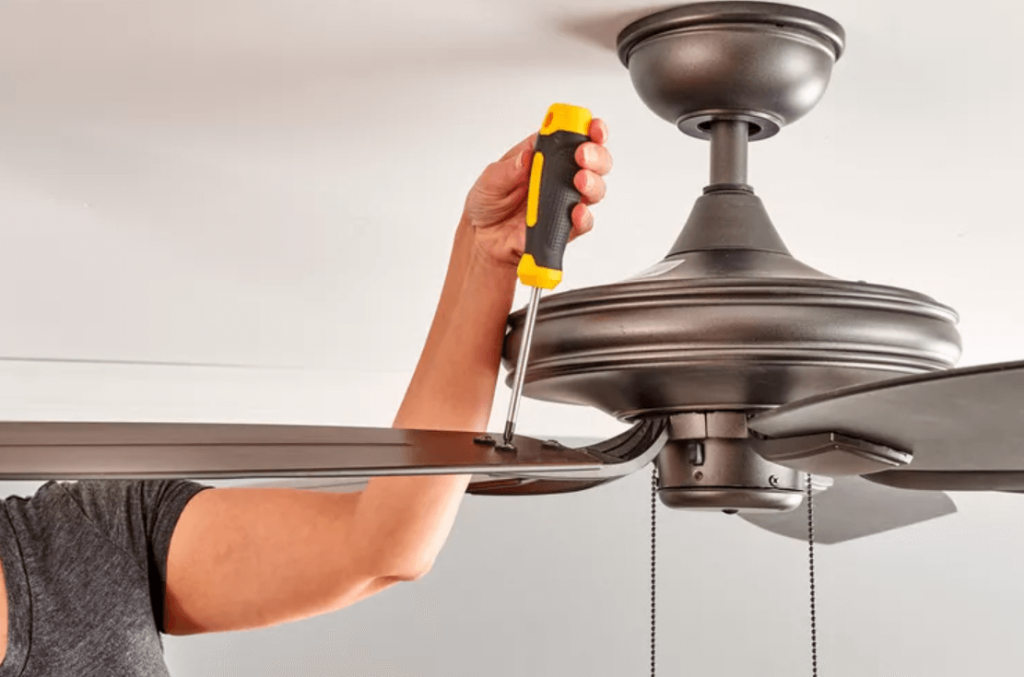
Step 2: Inspect the Fan Blades
Take a close look at the fan blades to see if they show any obvious signs of damage or wear. Sometimes, the issue could be that one or more blades are bent or cracked, which can lead to imbalances. If any blades are visibly damaged, they should be replaced before proceeding with the balancing process.
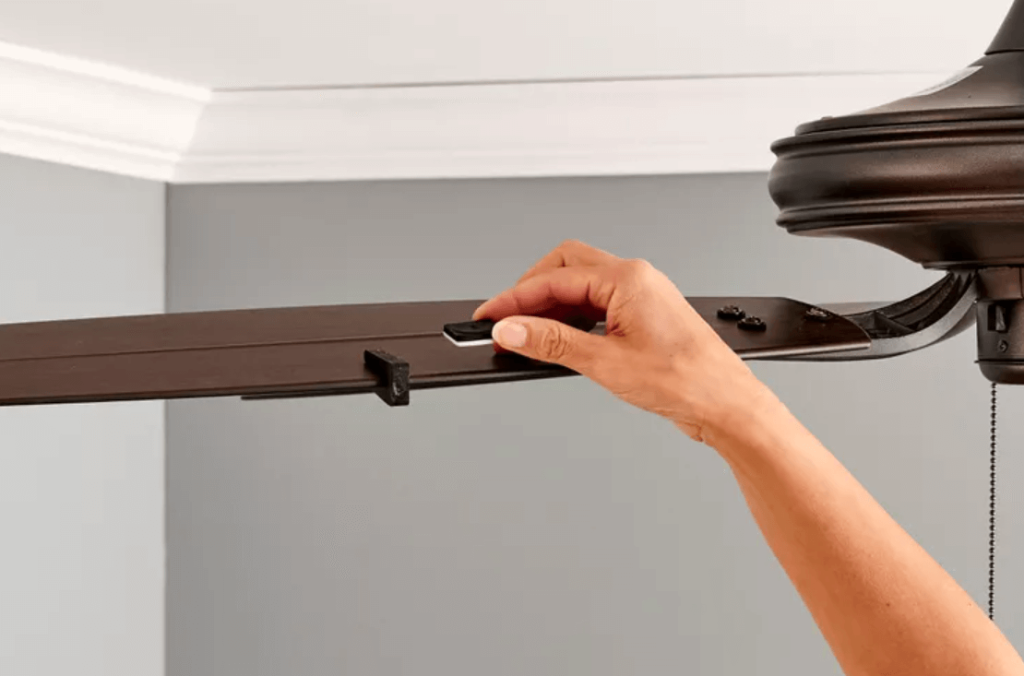
Step 3: Attach the Balancing Clip
The Hunter Ceiling Fan Balancing Kit includes balancing clips that help identify the source of the wobble. To begin, take the balancing clip and attach it to the center of one of the fan blades. The clip should be placed at the middle of the blade, where it has the most effect on testing.
- Note: Attach the clip to the blade while the fan is stationary, and avoid spinning it while adjusting.
Step 4: Turn the Fan Back On and Test for Wobbling
Once the balancing clip is securely attached to the blade, turn the fan back on to its lowest setting. Watch closely for any wobbling or uneven movement as the fan runs. The clip will help you identify whether one specific blade is causing the wobble.
- Tip: If the wobbling doesn’t stop, move the balancing clip to a different blade. You may need to try several blades to identify the source of the imbalance.
Step 5: Add Weights to the Fan Blades
After identifying which blade is causing the imbalance, it’s time to add the provided weights. Start by placing a small weight on the center of the problematic blade. Gradually increase the weight in small increments until you find the optimal balance that stops the wobbling.
- Important: Always add the weights one at a time and test the fan after each adjustment to ensure you are not overcompensating with too much weight.
Step 6: Remove the Balancing Clip
Once the wobble is eliminated, remove the balancing clip and any weights from the blade. This will return the fan to its normal appearance and performance.
- Tip: Double-check that the fan runs smoothly without any noise or wobbling before completing the process.
Step 7: Final Test
With the fan now balanced, run the fan on different speed settings to ensure it operates evenly. If the fan is running smoothly without any wobble or excessive noise, you’ve successfully balanced your Hunter ceiling fan.
- Pro Tip: Regularly inspect your ceiling fan and perform maintenance, including cleaning the blades and motor, to keep it operating efficiently.
By following these simple steps, you can restore the smooth, quiet operation of your Hunter ceiling fan, ensuring it continues to provide optimal comfort in your home. The Hunter Ceiling Fan Balancing Kit is an easy-to-use solution that can save you time, money, and the hassle of hiring a professional technician.
When to Call a Professional
While using the Hunter Ceiling Fan Balancing Kit is usually enough to fix minor wobbling issues, there are cases where the problem might be more complex. If you’ve followed the steps and the fan continues to wobble or make noise, it might indicate other underlying issues, such as:
- Motor malfunction: If the motor is worn or damaged, it could cause the fan to vibrate or operate inefficiently, even after balancing.
- Improper installation: If the fan wasn’t installed properly or securely, it could lead to persistent issues, including wobbling.
- Damaged blades: If any blades are cracked or warped, they may need to be replaced to restore proper functionality.
In these cases, it’s best to call a professional technician who specializes in ceiling fan repairs. They can diagnose the issue and ensure your fan is running at its best.
By regularly maintaining your Hunter ceiling fan and using the balancing kit as needed, you can extend the life of your fan and enjoy smoother, quieter performance for years to come.
Tips for Maintaining Your Hunter Ceiling Fan
Regular maintenance is key to keeping your Hunter ceiling fan running efficiently and smoothly. By taking the time to care for your fan, you can avoid future wobbling issues, extend the lifespan of the fan, and ensure it continues to provide optimal performance. Here are some essential tips to keep your Hunter ceiling fan in top condition:
1. Regularly Clean the Fan Blades
Dust and debris can accumulate on your ceiling fan blades, which not only affects its performance but can also contribute to wobbling if the build-up is uneven. Clean your fan blades every few months to prevent this from happening.
- How to clean: Use a microfiber cloth or a duster with an extension handle to gently wipe the blades. For tougher dirt, dampen the cloth slightly with warm water (but avoid soaking it) and wipe down the blades to remove any build-up.
- Tip: To prevent dust from accumulating too quickly, you can use a fan blade cleaner or dust-repellent spray.
2. Lubricate the Motor Regularly
The motor in your Hunter ceiling fan should be lubricated every 6 to 12 months. Lubrication ensures that the motor runs smoothly without strain, which can reduce the chance of performance issues, including wobbling and noisy operation.
- How to lubricate: Refer to your fan’s manual for the type of oil recommended for lubrication. Most ceiling fans use a light motor oil. Carefully remove the fan’s canopy, locate the motor’s bearings, and apply the recommended oil to keep the motor functioning properly.
- Pro Tip: Be cautious not to over-lubricate as excess oil can attract dust and debris.
3. Tighten All Screws and Connections
Loose screws or bolts can cause your Hunter ceiling fan to wobble or make noise. Over time, screws can become loose due to normal wear and tear. Periodically check the screws and connections to ensure everything is secure.
- How to check: Use a screwdriver to tighten all visible screws, including those on the fan blades, motor housing, and the ceiling mount. Don’t forget to check the pull chain and wall control switch to ensure they’re tightly connected.
- Tip: After tightening, give the fan a quick spin to see if it operates smoothly.
4. Inspect the Fan for Signs of Wear or Damage
Regularly inspect your Hunter ceiling fan for any signs of wear or damage, such as cracks in the blades, rust on the motor housing, or frayed wires. Catching these issues early can help prevent bigger problems later on.
- How to inspect: Turn off the power and visually check the fan blades for any cracks or warping. Check the motor for any rust or wear. If the blades are damaged or warped, it may be time to replace them.
- Tip: If your fan blades are in poor condition, replace them with the appropriate Hunter ceiling fan blades to restore balance and efficiency.
5. Check for Balanced Operation After Every Adjustment
After making any adjustments to the fan—whether it’s cleaning the blades, tightening screws, or replacing parts—always check that the fan is still balanced and operating smoothly. This will help you catch any issues right away.
- How to check: Turn on the fan and observe its operation. Look for any wobbling or irregular noises. If you notice an imbalance, use the Hunter Ceiling Fan Balancing Kit to correct the issue.
6. Keep the Area Around the Fan Free of Obstructions
Ensure that nothing is obstructing your Hunter ceiling fan or interfering with the airflow. Objects, such as light fixtures, curtains, or decorations, can restrict airflow and cause the fan to work harder than necessary, which can affect performance.
- Tip: Keep a safe distance of at least 3 feet around the fan to allow for proper airflow and efficient cooling.
7. Reset the Remote Control (if applicable)
If your Hunter ceiling fan has a remote control, it’s a good idea to reset it every few months to ensure proper communication between the fan and the remote. This can help resolve any remote-related issues that might be affecting the fan’s performance.
- How to reset: Most Hunter ceiling fans with remotes have a reset button. Refer to the user manual for specific instructions on how to reset the remote.
8. Schedule Professional Maintenance
If you’re unsure about any of the maintenance steps or if your fan continues to experience issues like wobbling or strange noises, it may be time to call in a professional. A ceiling fan technician can inspect the motor, wiring, and components to ensure everything is in working order.
- Tip: Many technicians offer regular maintenance packages that include cleaning, lubrication, and inspection of all fan components.
Where to Buy the Hunter Ceiling Fan Balancing Kit
The Hunter ceiling fan balancing kit is available for purchase on Amazon. If you’re looking for a reliable and affordable solution to fix your fan’s wobbling or uneven operation, this kit is an excellent choice. You can buy the Hunter ceiling fan balancing kit here: [Amazon link].
Conclusion: Restore Your Hunter Ceiling Fan to Its Best
A Hunter ceiling fan balancing kit is an easy and effective way to fix common ceiling fan issues like wobbling, shaking, and noise. By using the kit, you can restore your fan’s smooth operation, improve its efficiency, and reduce wear and tear on the motor.
If your Hunter ceiling fan is exhibiting speed problems or wobbling, investing in a balancing kit can help prolong its life and ensure you enjoy cool, quiet, and efficient air circulation for years to come.
Ready to fix your fan? Order your Hunter ceiling fan balancing kit today on Amazon and get back to enjoying a perfectly balanced fan in no time.
Leave a Reply