Replacing the mounting bracket on your Hunter ceiling fan is essential when your fan shows signs of wobbling, instability, or improper installation. The mounting bracket ensures that your ceiling fan stays securely attached to the ceiling while allowing it to operate at optimal performance. Over time, even the most durable ceiling fans may need a replacement bracket due to wear and tear, damage, or upgrading to a larger fan.
In this comprehensive guide, we will cover everything you need to know about Hunter ceiling fan mounting bracket replacement. From identifying the right parts to step-by-step installation, this guide will help you restore your Hunter ceiling fan to perfect working condition. We’ll also discuss the cost, where to buy genuine parts, and troubleshooting tips for common issues.
Whether you’re a DIY enthusiast or looking for easy-to-follow instructions, this guide will ensure that you can confidently replace the mounting bracket and get your fan running smoothly again.
2. What is a Mounting Bracket and Why Does It Need Replacement?
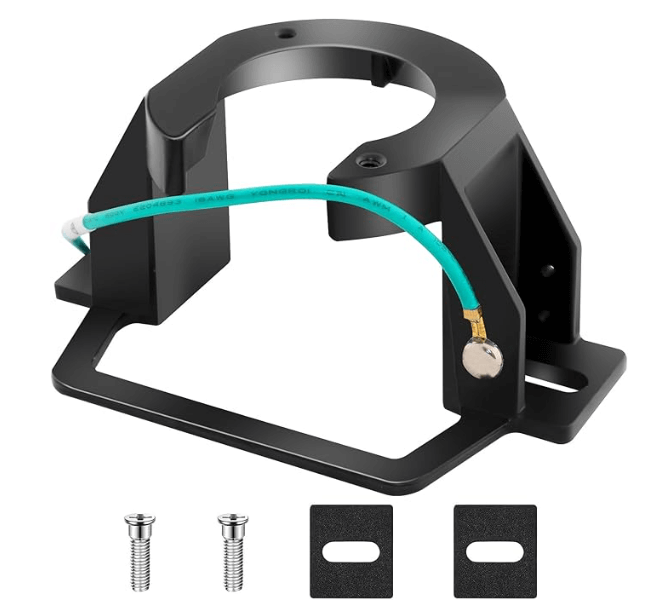
The mounting bracket is a crucial part of any ceiling fan system. It acts as the anchor point that holds the fan motor and blades to the ceiling, ensuring that your Hunter fan stays securely in place while it operates. If the mounting bracket becomes damaged, worn, or loose, it can result in wobbling, improper operation, or even cause the fan to fall.
Why Would You Need to Replace the Mounting Bracket?
Here are some common reasons why you might need to replace the mounting bracket of your Hunter ceiling fan:
- Wobbling or Instability: If your fan is wobbling or vibrating excessively, the mounting bracket might be the culprit. Over time, loose screws or damaged parts can cause the fan to become unbalanced.
- Improper Installation: If the fan wasn’t properly installed to begin with, the mounting bracket might not be holding the fan securely to the ceiling. In this case, replacing the bracket is necessary to restore stability.
- Wear and Tear: Even the best fans wear out after many years of use. Fan parts such as the mounting bracket can degrade, especially if subjected to high levels of humidity or constant movement.
- Upgrading to a Larger Fan: If you decide to upgrade your Hunter fan to a larger model, the original mounting bracket may not be suitable. Larger fans require a stronger bracket to handle the increased weight and airflow.
3. How to Identify the Right Replacement Mounting Bracket
Before purchasing a replacement mounting bracket, it’s essential to ensure that the part is compatible with your Hunter ceiling fan model. Here’s how you can identify the correct replacement bracket:
1. Locate Your Fan Model Number
The first step in identifying the right replacement parts is to locate your Hunter ceiling fan’s model number. This number will tell you exactly which parts are compatible with your fan.
- Where to Find the Model Number: The model number is typically located on the motor housing or top of the fan. You may need to remove the fan’s cover or blades to view the label.
- What Information is Included: The model number will tell you the fan’s series (e.g., 5-series, 2-series), the motor type, and other specifications that will help you find compatible parts.
2. Use the Hunter Fan Website or Manual for Compatibility
Once you’ve identified the model number, you can easily find replacement mounting brackets by searching the Hunter Fan website or consulting the user manual that came with your fan.
- Hunter Fan Website: The official Hunter ceiling fans website has a parts section where you can look up compatible parts based on your fan model number.
- User Manual: The manual will also have details on the mounting bracket and other parts that are designed to work with your specific fan.
4. Tools Needed for Mounting Bracket Replacement
Replacing a Hunter ceiling fan mounting bracket requires a few basic tools. Here’s a list of what you’ll need to get started:
Essential Tools:
- Screwdrivers (Phillips and flathead) for removing and tightening screws.
- Wrench or Socket Set for loosening bolts.
- Pliers to assist with removing any fasteners.
- Ladder to safely access the ceiling fan.
- Electrical Tape (optional) to secure wiring connections during installation.
Safety Gear:
- Safety Glasses to protect your eyes from debris and falling screws.
- Gloves to protect your hands from sharp edges and to improve grip while handling the mounting bracket.
5. Step-by-Step Guide: How to Replace Your Hunter Ceiling Fan Mounting Bracket
Now that we’ve covered the tools and parts, let’s go over the steps required to replace your Hunter ceiling fan mounting bracket. This is a straightforward DIY process that can restore your fan’s performance and prevent any wobbling or instability.
Step 1: Turn Off the Power
Before starting any work on your ceiling fan, turn off the power at the wall switch or circuit breaker to avoid electrical hazards.
Step 2: Remove the Fan Blades and Light Kit
If your Hunter ceiling fan has blades and a light kit, carefully remove these parts to reduce the fan’s weight and gain access to the mounting bracket.
Step 3: Remove the Old Mounting Bracket
Use your screwdriver or wrench to remove the screws or bolts that are securing the old mounting bracket to the ceiling and the fan motor. Gently lower the fan motor to take out the old bracket.
Step 4: Install the New Mounting Bracket
Take the new replacement mounting bracket and align it with the ceiling mount. Attach the mounting bracket to the ceiling securely, using the screws or bolts provided. Make sure the fan motor is correctly positioned on the new bracket.
Step 5: Reassemble the Fan
Once the new bracket is installed, reattach the fan blades, light kit, and any other components that were removed earlier.
Step 6: Test the Fan
Turn the power back on, and test the fan to make sure it’s properly secured and running smoothly. Check for any wobbling or noise that could indicate the bracket is not securely installed.
6. Where to Buy Hunter Ceiling Fan Mounting Brackets
When replacing the mounting bracket for your Hunter ceiling fan, it’s essential to purchase genuine replacement parts to ensure optimal performance. Below are the best places to buy your Hunter ceiling fan mounting bracket:
Official Hunter Fan Website
- Visit the Hunter Fan website for genuine parts and direct purchases. They offer a variety of replacement parts, including mounting brackets.
Buy Replacement Mounting Bracket at Hunter Fan Website – Affiliate Link
Authorized Retailers
- Amazon, Home Depot, and Lowe’s are trusted authorized retailers where you can find Hunter replacement parts, including the mounting bracket.
Shop Hunter Parts on Amazon – Affiliate Link
Find Mounting Bracket at Home Depot – Affiliate Link
Local Fan Shops
- Local home improvement stores and fan specialty stores often carry Hunter ceiling fan parts. Call ahead to ensure they have the correct mounting bracket for your fan model.
7. Cost of Hunter Ceiling Fan Mounting Bracket
When it comes to replacing the mounting bracket for your Hunter ceiling fan, understanding the potential costs is essential to help you make an informed decision. The cost of a mounting bracket can vary based on factors such as model compatibility, material quality, and whether you opt for professional installation. Below is a breakdown of the typical cost and what influences it.
1. Average Price Range for Replacement Brackets
The price of a Hunter ceiling fan mounting bracket typically falls within the following range:
- $20 – $50 for a genuine replacement mounting bracket.
- This price range covers standard mounting brackets for most Hunter ceiling fan models.
Factors that can affect the price include:
- Size: Larger or more complex brackets for bigger fan models may cost slightly more.
- Material: High-quality steel or rust-resistant materials tend to be on the higher end of the pricing spectrum.
2. Professional Installation Costs
While replacing a mounting bracket is a DIY-friendly task, some users may prefer to hire a professional for installation. This is especially true for those who aren’t familiar with electrical work or those who want to ensure the installation is safe and secure.
- Installation Cost: The average cost for professional installation typically ranges from $75 to $150 depending on your location and the complexity of the installation.
- Factors Affecting Installation Costs:
- Ceiling height: If your fan is installed in a high or difficult-to-reach spot, the installation may require extra tools or labor, increasing the cost.
- Fan size and weight: Larger fans may require more effort during installation, particularly if the mounting bracket needs to support additional weight.
Hiring a professional can be beneficial if you’re not comfortable with wiring or safety procedures. However, with proper guidance and tools, many users prefer to perform this task themselves.
3. Why You Should Invest in Genuine Hunter Parts
While third-party or aftermarket mounting brackets may seem like a more affordable option, genuine Hunter replacement parts provide the following benefits:
- Perfect Compatibility: Genuine parts are specifically designed for Hunter ceiling fans, ensuring a perfect fit and optimal performance.
- Durability: Hunter parts are made from high-quality materials that are designed to last, offering better longevity compared to aftermarket parts.
- Warranty: Using genuine Hunter parts often ensures that your fan’s warranty remains intact. This is important if you encounter any issues later and need to take advantage of Hunter’s warranty.
Investing in genuine replacement parts may initially cost a little more, but it pays off in the long run by ensuring your Hunter fan remains safe, efficient, and reliable for years to come.
8. Customer Reviews and Experiences
Before making a purchase, it’s helpful to look at real customer experiences regarding Hunter ceiling fan mounting brackets. Customer reviews often provide insight into installation ease, product quality, and overall satisfaction.
Real Feedback on Hunter Ceiling Fan Mounting Bracket
- Ease of Installation: Many customers appreciate how easy it is to install a replacement mounting bracket, especially when using genuine Hunter parts. Reviewers often mention that the brackets fit perfectly and align with the fan’s motor, making the installation smooth.
- Durability and Performance: Users often report that genuine replacement brackets offer improved stability and reduced wobbling, restoring their fan’s optimal performance. A correctly installed bracket ensures the fan operates quietly and with minimal vibration.
- Installation Support: Some customers mention how helpful the Hunter fan manual is when performing the installation. With clear instructions and diagrams, users can install replacement parts with ease.
Success Stories
Many customers who replaced their mounting brackets found that their Hunter ceiling fans regained stable operation and reduced noise. One reviewer mentioned, “My fan has never been so quiet! The new mounting bracket fixed the wobbling, and it’s like having a brand-new fan.”
9. Conclusion
Replacing the mounting bracket on your Hunter ceiling fan is an essential part of maintaining its stability, performance, and longevity. Whether you’re replacing the bracket due to damage, wobbling, or upgrading to a larger fan, the process is relatively straightforward with the right tools and knowledge. Remember, opting for genuine Hunter replacement parts ensures compatibility, durability, and keeps your fan operating smoothly for years to come.
- Where to Buy: Purchase your Hunter ceiling fan mounting bracket from trusted sources like the Hunter Fan website, Amazon, Home Depot, or Lowe’s to ensure you’re getting a high-quality part.
- Installation: If you’re confident in your DIY skills, follow the easy installation steps to get your Hunter fan back in working order. If you need help, don’t hesitate to seek professional assistance.
By replacing a faulty mounting bracket, you’ll ensure your Hunter ceiling fan continues to operate efficiently, providing you with cool comfort and energy savings for years to come.
For more detailed installation or troubleshooting guidance, feel free to visit our Hunter Ceiling Fans Installation Guide for additional tips and help.
Leave a Reply