If you’re looking to replace, clean, or simply upgrade the trim ring on your Hunter ceiling fan, this guide will help you do so quickly and effectively. The trim ring is a decorative component that surrounds the canopy of your fan. It adds a polished look to the fan while covering the mounting hardware. Over time, trim rings can become dirty, damaged, or outdated, necessitating a replacement or removal.
In this article, we’ll guide you through Hunter fan canopy trim ring removal. Whether you’re upgrading the look of your fan or accessing internal parts for maintenance, the steps are easy to follow.
1. Tools and Safety Gear
Before diving into the trim ring removal process, make sure you have the necessary tools and safety precautions.
Essential Tools:
- Flathead screwdriver or plastic pry tool: These tools are essential for gently prying off the trim ring without damaging the fan or the surrounding components.
- Phillips screwdriver: If the trim ring is secured with screws, you’ll need this tool to unscrew the fasteners.
- Ladder: To safely access the fan and reach the ceiling.
- Pliers (optional): If you need to manipulate or handle wires.
Safety Precautions:
- Turn off the power to the ceiling fan at the wall switch or circuit breaker before beginning any work.
- Wear safety glasses to protect your eyes from any falling debris or particles.
- Use gloves to protect your hands from sharp edges, especially when handling the trim ring or fan components.
2. Why You Might Need to Remove the Canopy Trim Ring
There are several reasons why you may need to remove the trim ring from your Hunter fan:
- Cleaning: Dust, dirt, and debris tend to accumulate on the fan blades and trim ring, which can affect your fan’s performance and aesthetic. Regular cleaning can help improve airflow and the overall look of the fan.
- Upgrading or Replacing the Trim Ring: If your trim ring is damaged, outdated, or you simply want a new finish, removing it will allow you to install a new one.
- Accessing Internal Parts: If you need to perform maintenance on the fan motor, light kit, or other internal components, removing the trim ring will give you better access to these parts.
3. Step-by-Step Guide: How to Remove a Hunter Fan Canopy Trim Ring
Removing the Hunter fan canopy trim ring is typically a straightforward task, whether it’s secured with screws or just clips. Here’s a step-by-step guide to help you with the process.
Step 1: Turn Off the Power
Safety is paramount. Ensure the power to your Hunter ceiling fan is off by switching off the wall switch or circuit breaker before starting any work.
Step 2: Remove Fan Blades and Light Kit (if applicable)
If your fan has blades or a light kit, it’s best to remove them before tackling the trim ring. This will make the fan lighter and give you better access to the canopy. To remove the blades:
- Unscrew the fan blades from the motor housing.
- If necessary, unscrew the light kit and disconnect any wiring.
Step 3: Inspect the Trim Ring for Securing Mechanisms
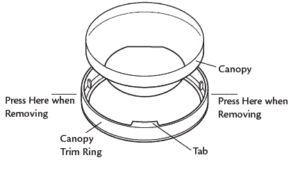
Before removing the trim ring, carefully inspect it to determine how it is secured. There are typically two common ways trim rings are attached to the canopy:
- Clips: Some trim rings are held in place by clips that snap into the fan’s motor housing.
- Screws: Other models might secure the trim ring with small screws around the edge.
If the trim ring uses clips, you can proceed to the next step. If it uses screws, you’ll need to unscrew them first.
Step 4: Removing the Trim Ring
- If the Trim Ring is Secured with Clips:
- Use a plastic pry tool (or a small flathead screwdriver) to gently pry around the edge of the trim ring. Work your way around the ring slowly to avoid damaging the fan or trim. Apply gentle pressure to loosen the clips, and once loose, pull the trim ring off.
- If the Trim Ring is Secured with Screws:
- Use a Phillips screwdriver to remove the screws securing the trim ring. Unscrew each screw and keep them aside in a safe place. After all screws are removed, gently pull the trim ring off the canopy.
Step 5: Inspect the Trim Ring for Damage or Dirt
Once the trim ring is removed, check for any damage such as cracks or dirt buildup. If it’s in good condition and you’re planning to reinstall it, clean the trim ring and surrounding fan components.
Step 6: Reinstall or Replace the Trim Ring
If you’re planning to replace the trim ring or upgrade to a new one, simply align the new ring with the canopy and secure it either by snapping the clips back into place or tightening the screws (depending on your model).
4. Troubleshooting Common Issues with Canopy Trim Ring Removal
If you run into any issues during the removal of the Hunter fan canopy trim ring, here are some common problems and their solutions:
- Stuck Trim Ring: If the trim ring is stuck and won’t come off, check for any hidden clips or screws that you may have missed. Use a plastic pry tool to gently work around the ring, making sure not to damage the finish.
- Damaged Trim Ring: If the trim ring is cracked or broken during removal, you can purchase a replacement trim ring from the Hunter Fan website or authorized retailers.
- Fan Wobbling After Reinstallation: If the fan starts wobbling after you reinstall the trim ring, make sure that the fan blades are securely attached and that all screws are tightened correctly.
5. Where to Buy Replacement Hunter Fan Canopy Trim Rings
If you need to replace your Hunter fan canopy trim ring, you can purchase a genuine replacement from the following places:
- Official Hunter Fan Website: For genuine Hunter parts, visit the official Hunter ceiling fans website to find the right trim ring for your fan model.
- Amazon: Amazon often has competitive pricing for Hunter ceiling fan parts, including trim rings.
- Home Depot or Lowe’s: These retailers also stock Hunter replacement parts for ceiling fans, including trim rings.
Shop Hunter Trim Ring on Amazon – Affiliate Link
6. Conclusion
Removing your Hunter fan canopy trim ring is an important task that helps maintain your fan’s appearance and functionality. Whether you need to clean the trim ring, replace it, or upgrade it, following the steps outlined in this guide will ensure a smooth and safe removal process. Remember to use the right tools, follow the safety instructions, and check for any issues during reinstallation. If you encounter any problems or need replacement parts, visit trusted retailers or the official Hunter Fan website. For more tips on fan maintenance and replacement parts, be sure to visit our Hunter ceiling Fan Replacement Parts Guide for further assistance.
Leave a Reply